
What Is Git and Why Is It Used?
Git is a free and open-source version control system. It is used to track changes in files. It helps developers manage multiple versions of a project, collaborate with teams, and try new features using branches. Git is fast, reliable, platform-independent, and works well for both small and large projects.
Why Git Is Important ?
- Keeps a history of all files
- Allows multiple developers to work on the same project
- Supports branching and merging
- If anything breaks, we can recover from the old version
Git Alternatives
- GitLab
- SVN (Subversion)
- Bitbucket
Git Workflow
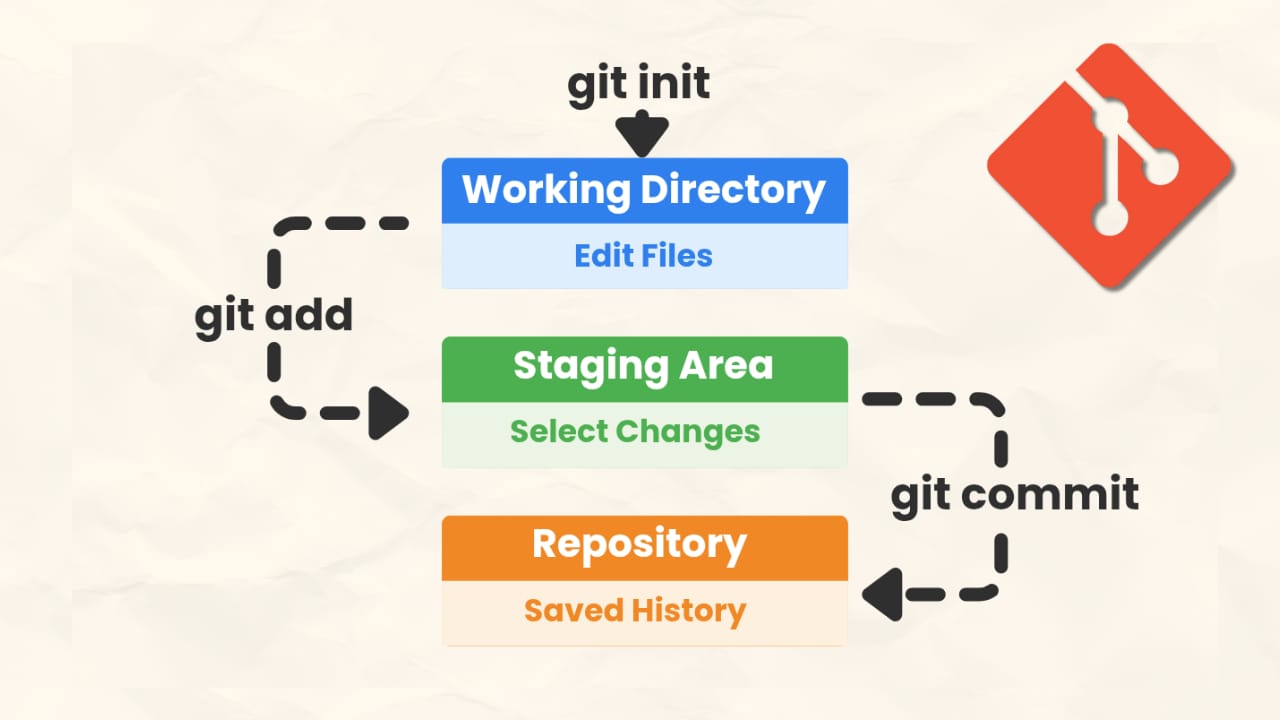
In Git, there are mainly three stages:
- Working Directory
- Staging Area
- Repository
1) Working Directory
This is your working project folder where you create, edit, and delete files. In this stage, Git is aware of these files, but it does not track changes until you add them to the staging area.
2) Staging Area
The staging area is like a rough draft space. It contains the file or multiple files you can select using git add that will go into your next commit.
3) Repository
In this stage, the repository stores all committed versions of your project. It includes file snapshots, commit history, branches, and tags.
Installing Git
Go to the official Git website, select your operating system, and follow the installation instructions.to check git version use this command git –version
Track and Commit Commands
| Command | Description |
|---|---|
| git init | Creates a new Git repository by generating a hidden .git folder. |
| git add file.txt | Adds a single file to the staging area. |
| git add file1.txt file2.txt | Adds multiple specific files to the staging area. |
| git add . | Adds all modified and new files to the staging area. |
| git commit -m “message” | Saves staged changes into the repository with a message. |
| git status | Shows the current state of the working directory and staging area. |
| git log | Displays the full commit history. |
| git log –oneline | Shows a compact version of commit history. |
| git log -2 | Displays the last two commits. |
Track and Commit Commands – Practical Example
Follow these simple steps to see Git commands in action:
Step 1: Initialize a Git Repository
Create a folder called git-practice and open the terminal. Run the command:
git init
This creates a .git folder in your project directory.

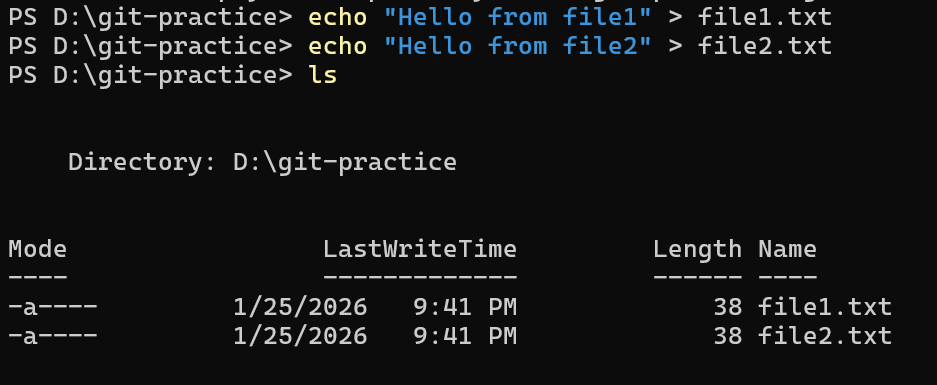
Step 2: Create Sample Files
Create two sample files, file1.txt and file2.txt, and add some content using echo commands:
echo "Hello from file1" > file1.txt
echo "Hello from file2" > file2.txt
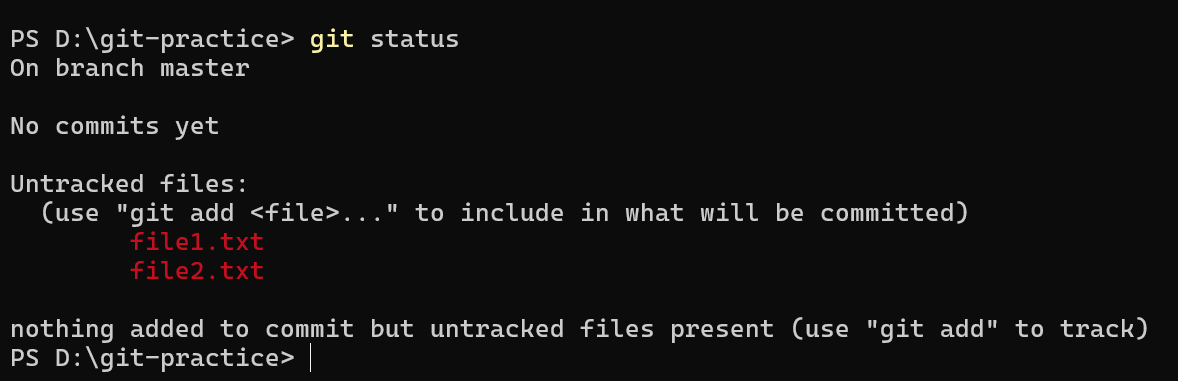
Step 3: Check File Status
Check whether the files are being tracked by Git:
git status
Files not yet staged will appear as untracked.
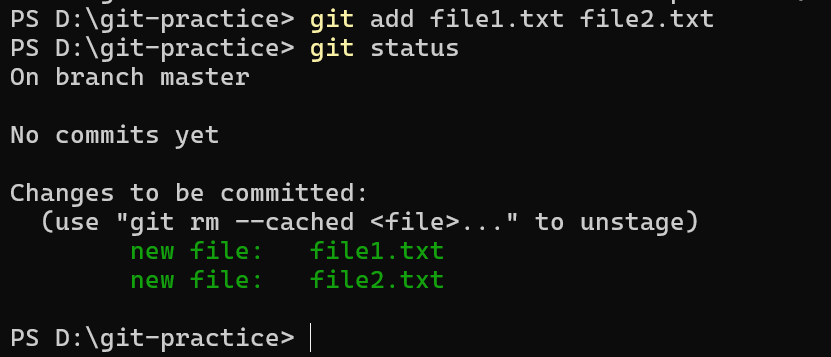
Step 4: Stage the Files
To start tracking the files, run:
git add file1.txt file2.txt
git status
The files will now appear in the staging area.
Step 5: Commit Changes
Save your changes to the repository:
git commit -m "Initial commit"
Now, view the commit history:
git log
git log --oneline
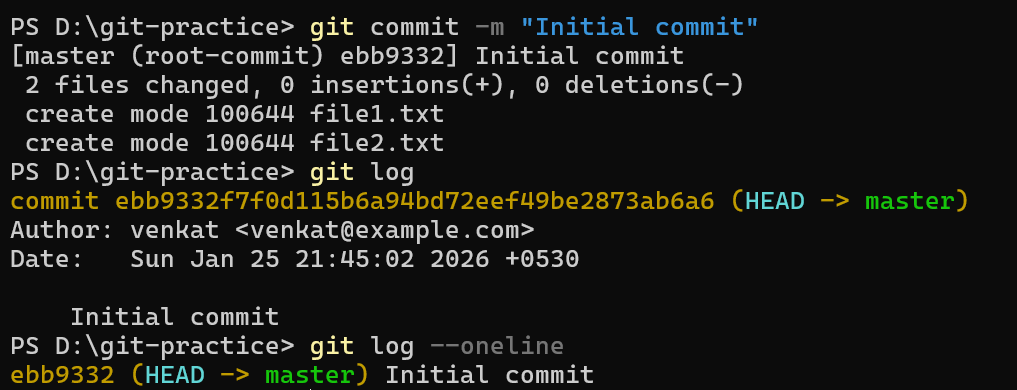
This shows the commit details in full and compact formats.
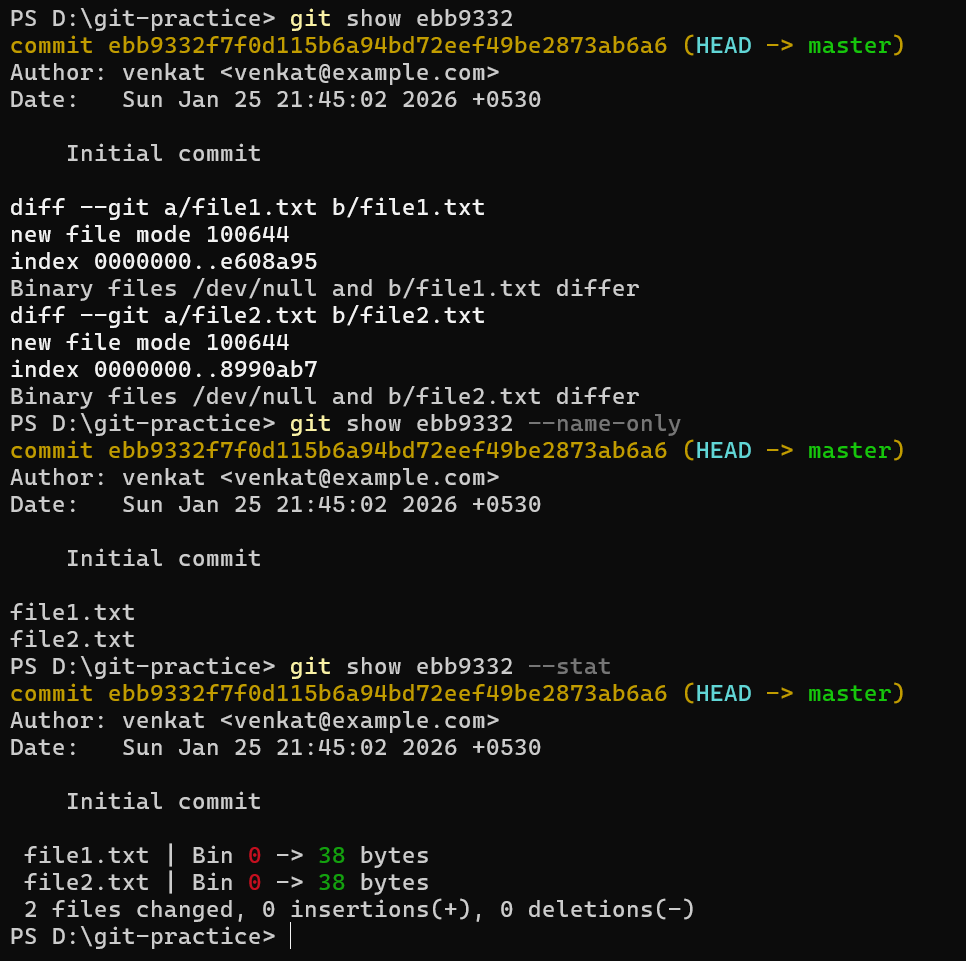
Git Show Commands
| Command | Description |
|---|---|
| git show <commit-id> | Shows full details of a specific commit, including changes. |
| git show <commit-id> –name-only | Shows only the file names changed in a commit. |
| git show <commit-id> –stat | Shows a summary of file changes and line counts. |
Git Configuration
| Command | Description |
|---|---|
| git config –global user.name “Your Name” | Sets the username for all repositories. |
| git config –global user.email “youremail@example.com” | Sets the email for all repositories. |

Git Reset Commands
| Command | Description |
|---|---|
| git reset –soft HEAD~1 | It is used to delete the latest commit while keeping the changes. |
| git reset –hard HEAD~1 | It is used to delete the latest commit and its changes. |
| git update-ref -d HEAD | It is used to delete all commits at once by removing the HEAD reference. |
Git Reset Commands – Practical Example
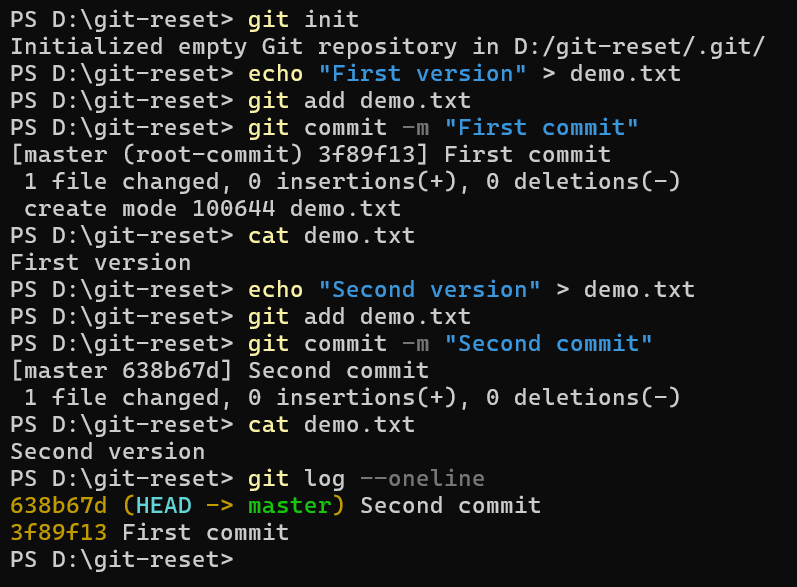
Step 1: Create a File and Make Two Commits
Let’s create a folder called git-reset, open a terminal, create a file called demo.txt, and make two commits to understand reset commands.
echo "First version" > demo.txt
git add demo.txt
git commit -m "First commit"

echo "Second version" > demo.txt
git add demo.txt
git commit -m "Second commit"
git log --oneline shows both commits
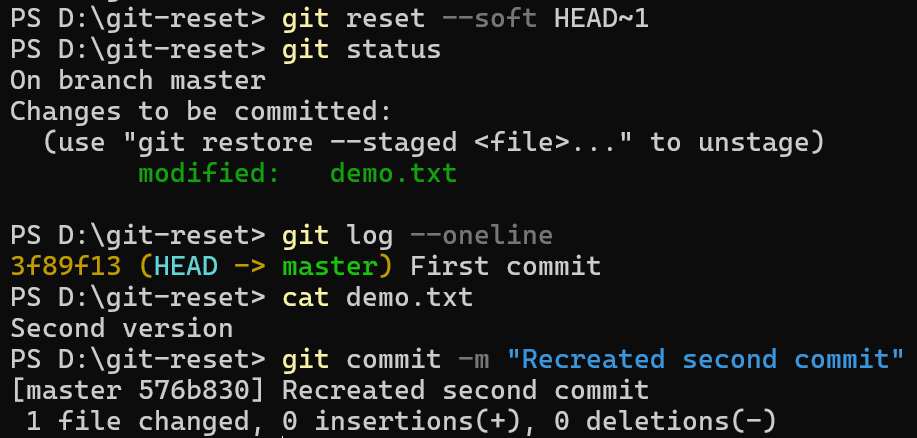
Step 2: Delete the Latest Commit but Keep the Changes
git reset --soft HEAD~1
git status
The latest commit ID will not be shown, but the file changes will remain the same and stay in the staging area.
git log --oneline now shows only one commit.
Let’s create another commit so the repository still has two commits for the next step:
git commit -m "Recreated second commit"
Step 3: Delete the Latest Commit and Its Changes
git reset --hard HEAD~1
git status
The latest commit ID and the file changes will also be removed.
git log --oneline now shows only one commit.

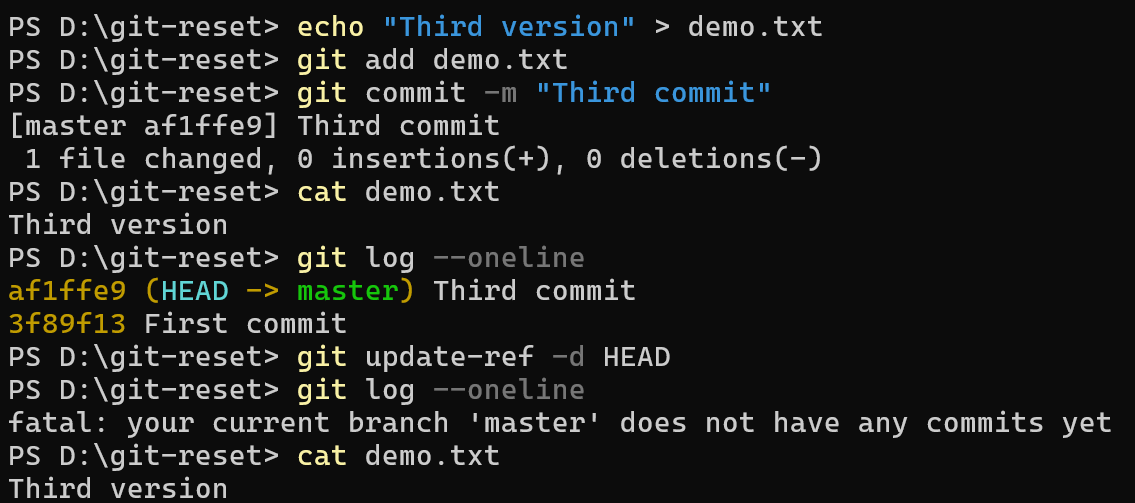
Step 4: Delete Commit History While Keeping Files
Let’s create another commit so the repository still has two commits for the next step:
echo "Third version" > demo.txt
git add demo.txt
git commit -m "Third commit"
Now we will remove the remaining commit without deleting the file by deleting the HEAD reference.
git update-ref -d HEAD
After performing this command, all commit history is deleted, but the file changes remain the same.
Git Commit Amend
Fixes the last commit message, adds missed files to the last commit, and updates incorrect commit details
| Command | Description |
|---|---|
| git commit –amend | Edits the last commit. |
| git commit –amend –author=”Name <email>” | Changes the author of the last commit. |
| git commit –amend -m “message” | Updates the commit message. |
| git commit –amend –no-edit | Keeps the same commit message and adds staged changes. |
Git Commit Amend – Practical Example
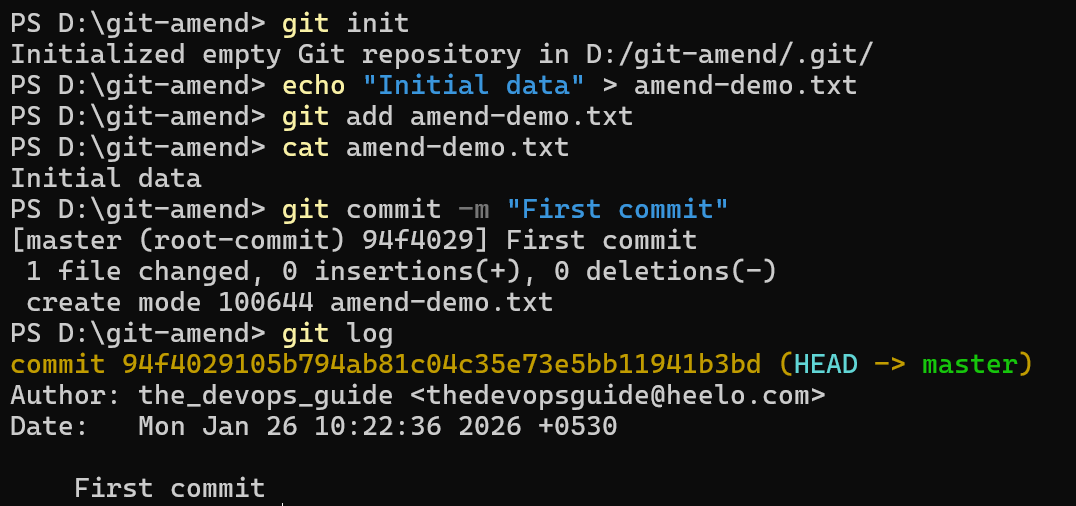
Step 1: Create an Initial Commit
First, Create a folder called git-amend and open the terminal. Run the command:
echo "Initial data" > amend-demo.txt
git add amend-demo.txt
git commit -m "First commit"
git log shows one commit with author and commit message details.
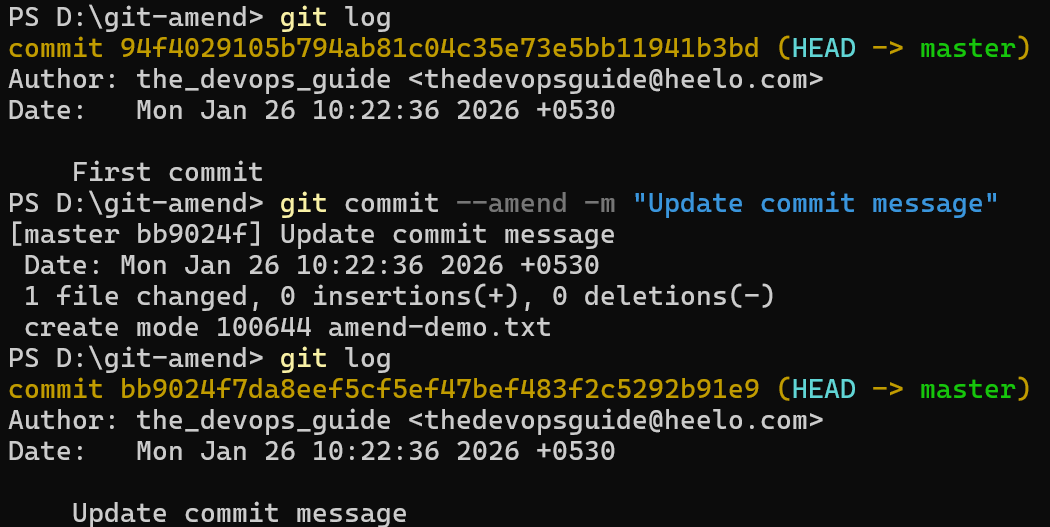
Step 2: Edit the Last Commit Message
Use this command to change the last commit message.
git commit --amend -m "Update commit message"
This updates the commit message without creating a new commit.
git log shows the updated commit message.
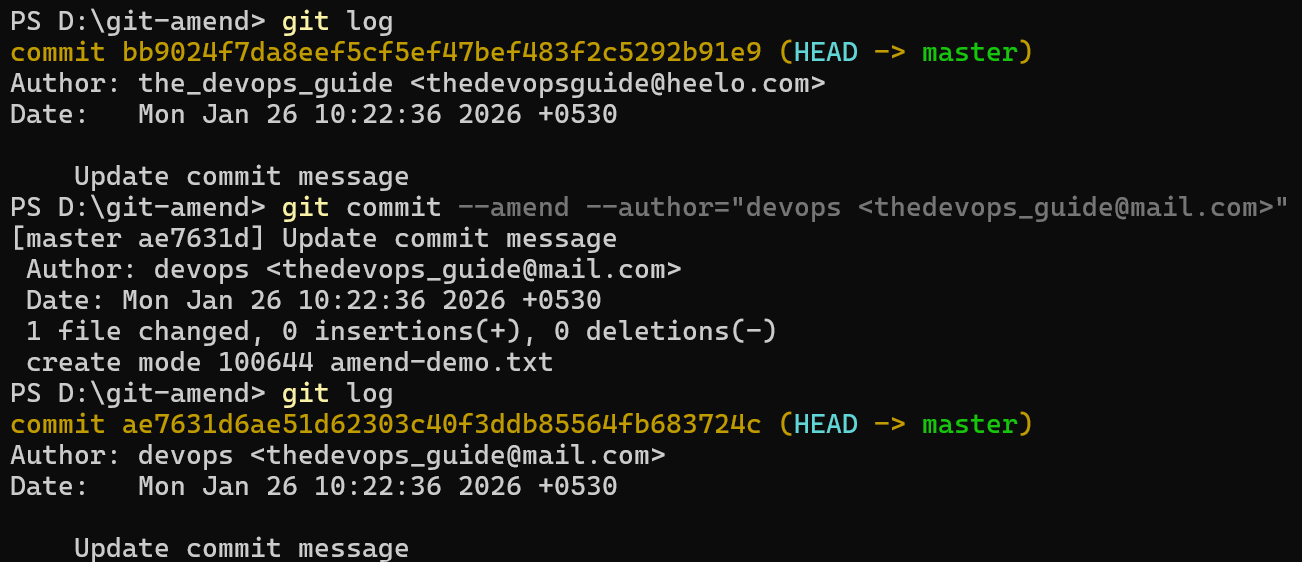
Step 3: Change the Author of the Last Commit
Use this command to change the author name and email of the last commit.
git commit --amend --author="New Name <newemail@example.com>"
This updates the author details of the last commit.
git log shows the new author name.
Step 4: Keep the Same Commit Message and Add Changes
First, modify the file and stage the changes.
echo "Additional content" >> amend-demo.txt
git add amend-demo.txt
Now, amend the commit without changing the commit message.
git commit --amend --no-edit
This keeps the same commit message and adds the newly staged changes to the last commit.
git log showing the same commit message with updated content.

Git Cherry-Pick and Reflog
| Command | Description |
|---|---|
| git cherry-pick <commit-id> | Applies a specific commit from another branch. |
| git reflog | Shows a history of all HEAD changes for recovery. |

Git Branches
Branches allow you to work on features or fixes without affecting the main codebase.
| Command | Description |
|---|---|
| git branch | Lists all branches. |
| git branch new-branch | Creates a new branch. |
| git checkout new-branch | Switches to an existing branch. |
| git checkout -b new-branch | Creates and switches to a new branch. |
| git branch -m old-name new-name | Renames a branch. |
| git branch -d branch-name | Deletes a branch safely. |
| git branch -D branch-name | Force deletes a branch. |
| git reflog | Helps recover a deleted branch. |
Git Branch Commands – Practical Example
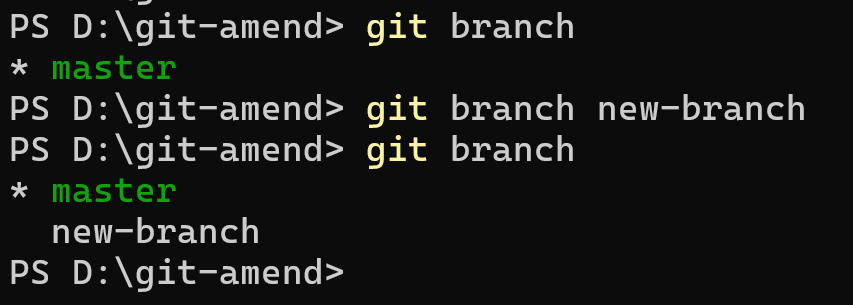
Step 1: List All Branches
git branch
Shows all existing branches in the repository. By default, you’ll see main or master.
Step 2: Create a New Branch
git branch new-branch
Creates a new branch called new-branch. The repository stays on the current branch.
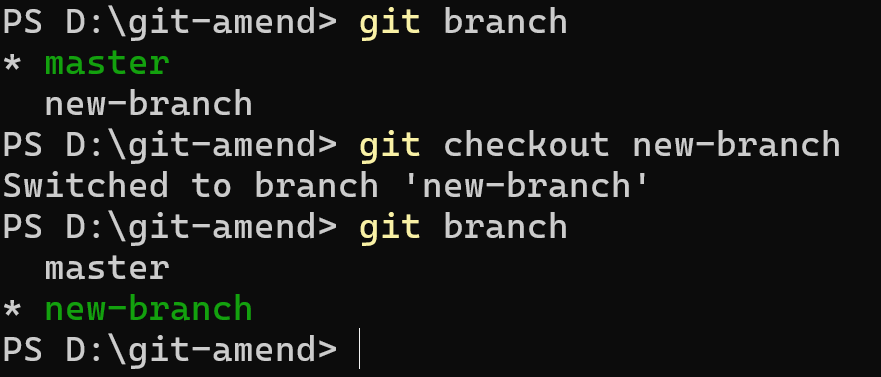
Step 3: Switch to an Existing Branch
git checkout new-branch
Switches to the branch new-branch.
Step 4: Create and Switch to a New Branch
git checkout -b feature-branch
Creates a branch called feature-branch and immediately switches to it.

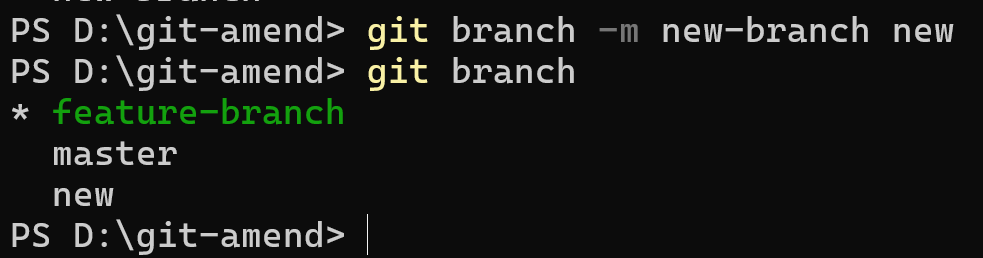
Step 5: Rename a Branch
git branch -m old-name new-name
Renames the branch old-name to new-name. Must be on the branch or specify the branch name explicitly.
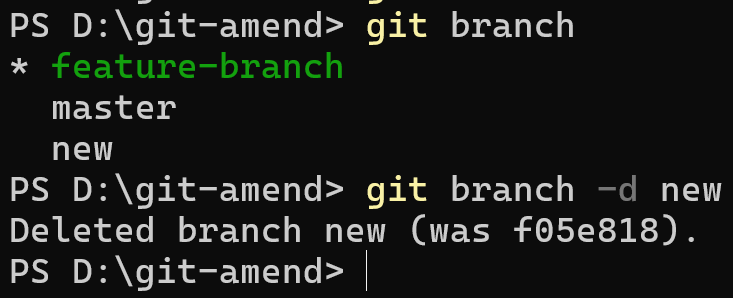
Step 6: Delete a Branch Safely
git branch -d branch-name
Deletes branch-name if it has been fully merged into the current branch.
Step 7: Force Delete a Branch
git branch -D branch-name
Force deletes branch-name regardless of merge status.
Step 8: Recover a Deleted Branch Using Reflog
git reflog
git checkout -b recovered-branch HEAD@{1}
Use git reflog to find the commit reference of a deleted branch, then recreate the branch using git checkout -b.
Git Restore, Revert, and Logs
| Command | Description |
|---|---|
| git restore file.txt | Discards local changes in a file. |
| git revert <commit-id> | Creates a new commit that reverses changes. |
| git log | Displays commit history. |
.gitignore File
In Git, we prevent files and folders from being tracked by placing their names in the .gitignore file, as shown below.
- node_modules/
- *.log
- .env
Git Merge vs Rebase
Merge

The Git merge command is used to merge two branches and create a new merge commit.
Rebase
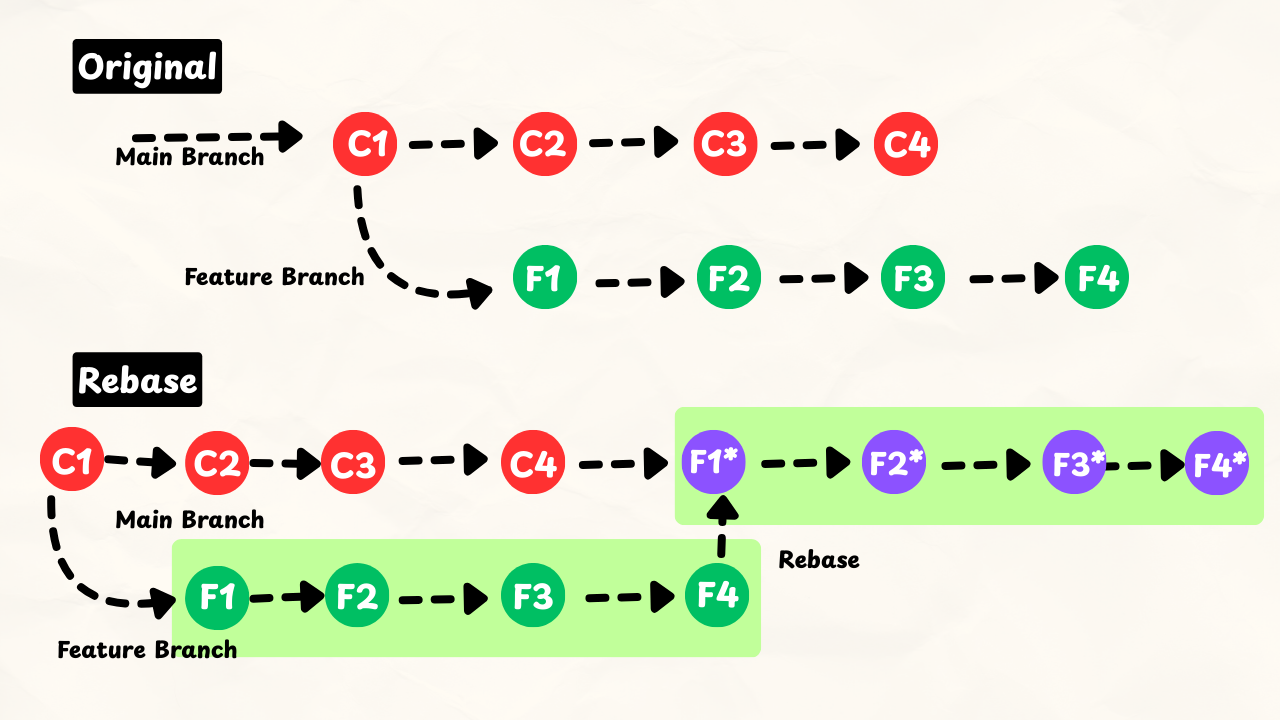
Git rebase is also used to merge two branches; it moves your commits on top of another branch. Rebase creates a clean and linear commit history.
Git Stash
Git stash temporarily saves your uncommitted changes without creating a commit.
Common Scenarios to Use Stash:
- Switch branches mid-feature
- Pull latest code with uncommitted changes
- Clean working directory without losing work
| Command | Detailed Description |
|---|---|
| git stash | Saves changes to a temporary stash. |
| git stash save “work in progress” | Saves changes with a message. |
| git stash list | Shows all stashes. |
| git stash apply | Restores latest stash without deleting it. |
| git stash pop | Restores latest stash and removes it. |
| git stash drop stash@{0} | Deletes specific stash. |
| git stash clear | Deletes all stashes. |
Git Stash Commands – Practical Example
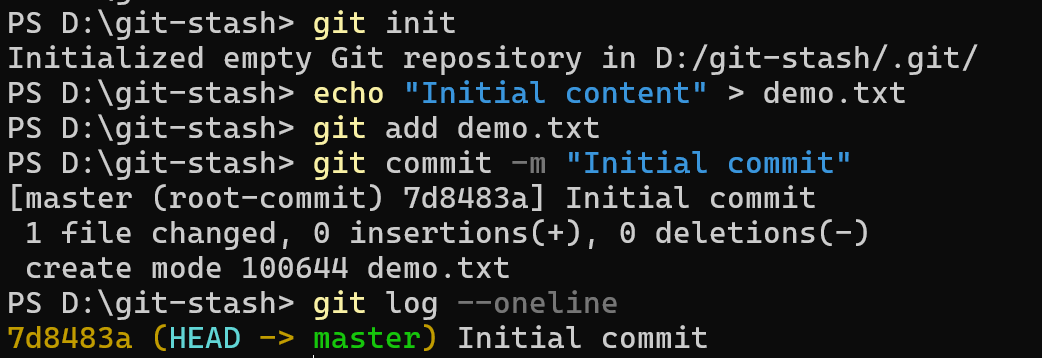
Step 1: Creates a new folder called git-stash and initializes a Git repository.
Step 2: Create a File and Commit It
echo "Initial content" > demo.txt
git add demo.txt
git commit -m "Initial commit"
Creates demo.txt and saves it in the first commit.
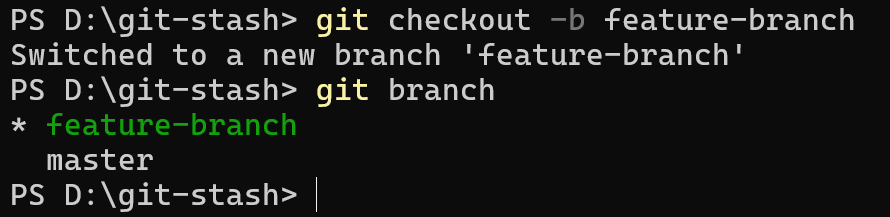
Step 3: Create a New Branch Called feature-branch
git checkout -b feature-branch
Creates a new branch called feature-branch and switches to it.
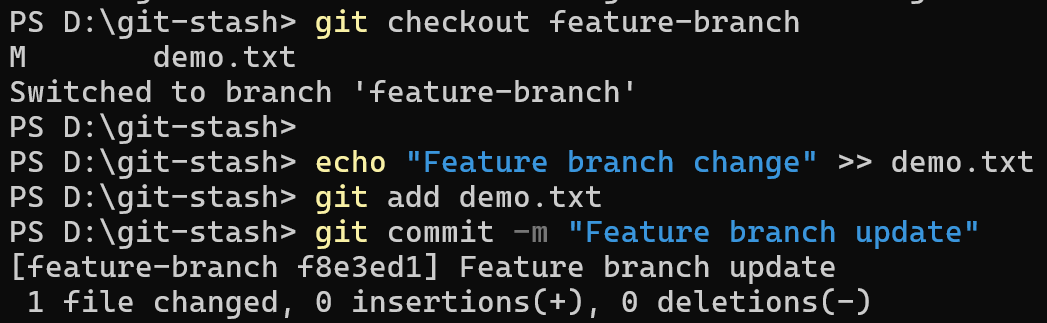
On feature-branch, change the file and commit it:
git checkout feature-branch
echo "Feature branch change" >> demo.txt
git add demo.txt
git commit -m "Feature branch update"
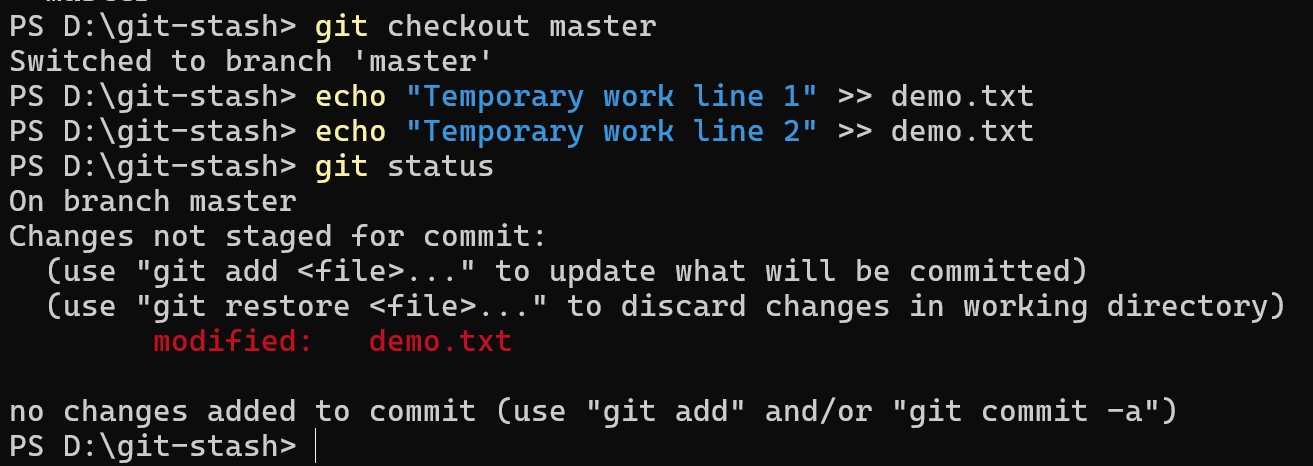
Step 4: Switch Back to master Branch and Make Uncommitted Changes
git checkout master
echo "Temporary work line 1" >> demo.txt
echo "Temporary work line 2" >> demo.txt
git status
Shows demo.txt as modified but not committed.
Step 5: Try Switching to feature-branch
git checkout feature-branch
Git blocks the branch switch because there are uncommitted changes that would be overwritten.

Step 6: Stash the Changes and Switch to feature-branch After Stashing
git stash
git status
Saves the current changes to a temporary stash and cleans the working directory.

git checkout feature-branch
Now Git allows switching branches because the working directory is clean.
Step 7: Apply the Latest Stash on master
git stash apply
git status
Restores the stashed changes on the master and keeps the stash in the list.
Step 8: Pop the Latest Stash
git stash pop
git status
Restores the latest stash and removes it from the stash list.
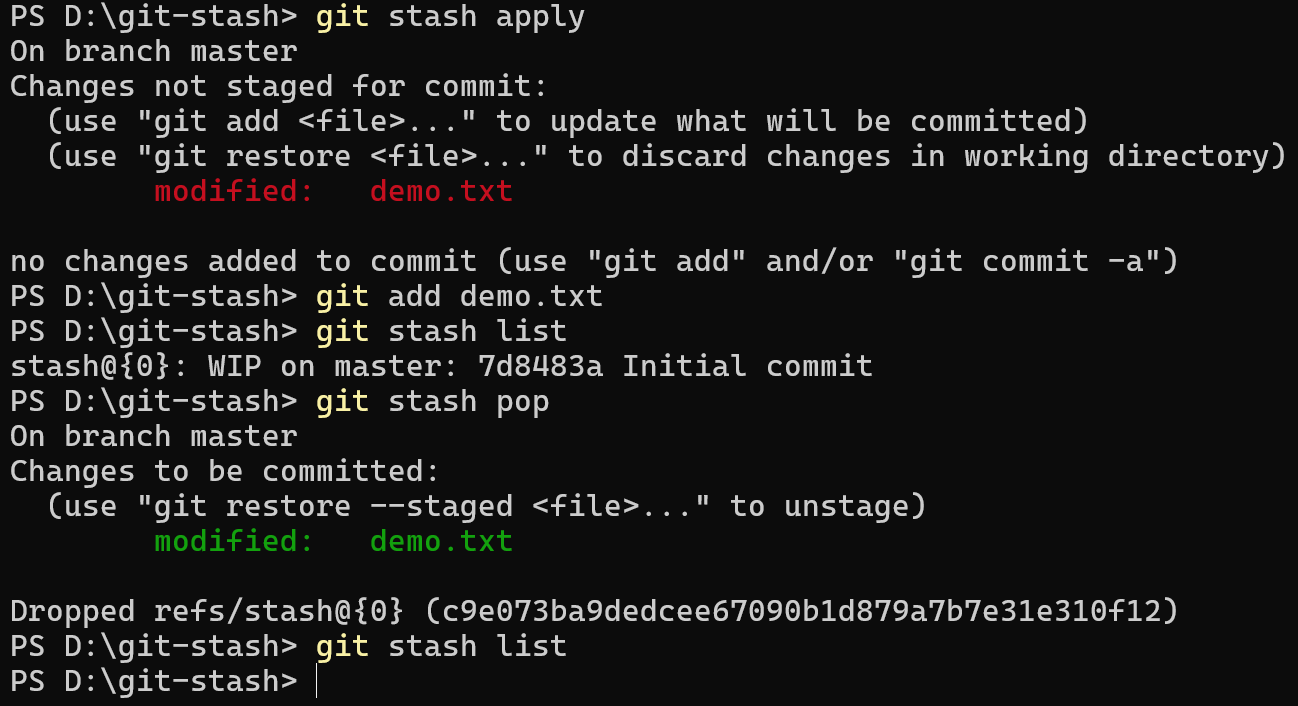
Step 9: Delete a Specific Stash
git stash drop stash@{0}
git stash list
Deletes a specific stash entry.
Step 10: Delete All Stashes
git stash clear
git stash list
Deletes all stash entries permanently.
Git tags
Tags mark specific commits, usually for releases like v1.0, v2.0.
| Command | Detailed Description |
|---|---|
| git tag | Lists all tags. |
| git tag v1.0 | Creates a tag. |
| git tag -d v1.0 | Deletes tag locally. |
| git show v1.0 | Displays commit details for a tag. |
Git Tag Commands – Practical Example
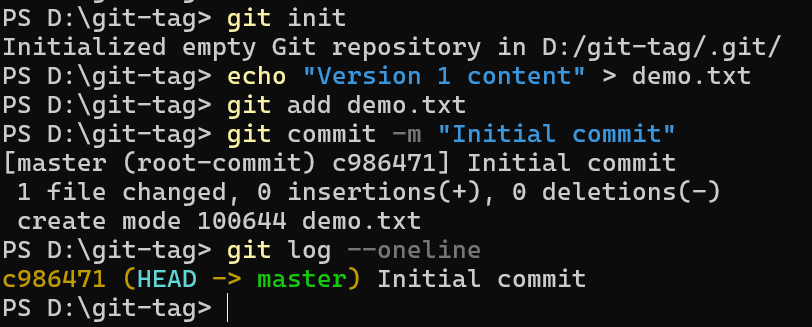
Step 1: Creates a new folder called git-tag and initializes a Git repository.
Step 2: Create a File and Make the First Commit
echo "Version 1 content" > demo.txt
git add demo.txt
git commit -m "Initial commit"
Creates demo.txt and saves it in the first commit.
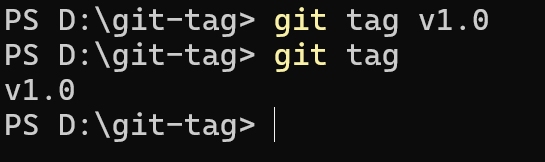
Step 3: Create a Tag and List All Tags
git tag v1.0
Creates a lightweight tag called v1.0 for the current commit.
git tag
Displays all existing tags in the repository.
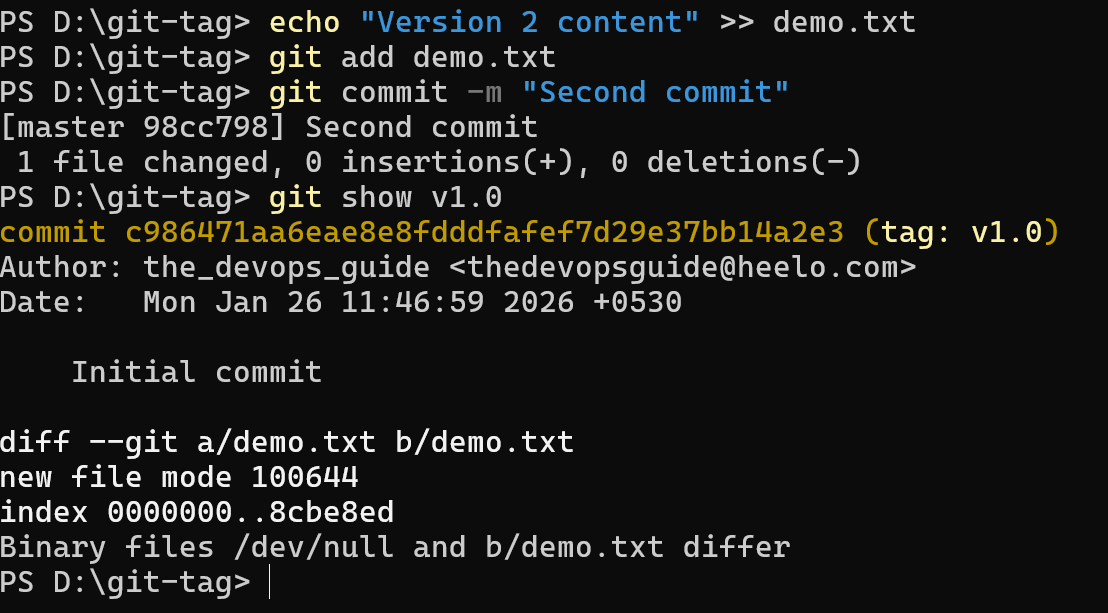
Step 5: Make Another Commit and Show Tag Details
echo "Version 2 content" >> demo.txt
git add demo.txt
git commit -m "Second commit"
Updates demo.txt and saves the second commit.
git show v1.0
Displays the commit details and file changes for the v1.0 tag.
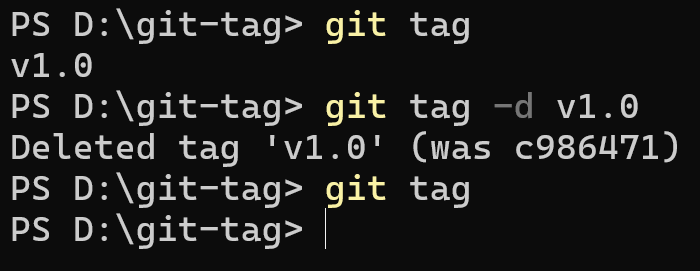
Step 7: Delete a Tag Locally
git tag -d v1.0
git tag
Deletes the v1.0 tag locally and confirms it is removed.
Merge Conflicts
Merge conflicts happen when two branches modify the same file differently. Git pauses the merge for manual resolution.
Steps to Resolve a Merge Conflict
1) Start the merge
git merge feature
2) Edit conflicted file
<<<<<<< HEAD Your changes ======= Other branch changes >>>>>>> feature
3) Mark resolved
git add file.txt
4) Complete merge
git commit -m "Resolved merge conflict"
What is GitHub?
GitHub is a web-based platform for hosting Git repositories. It simplifies collaboration by allowing teams to share code, track issues, and manage versions online. GitHub works on top of Git and supports a complete Git workflow for developers.
GitHub Commands
| Command | Description |
|---|---|
| git remote add origin https://github.com/user/repo.git | Adds a remote named origin pointing to the GitHub repository. |
| git remote -v | Displays the configured remote repositories and their URLs. |
| git push -u origin main | Pushes commits to the remote main branch and sets upstream tracking. |
| git push –all origin | Pushes all local branches to the remote repository. |
| git clone https://github.com/user/repo.git | Downloads the repository and creates a local copy. |
| git pull origin main | Fetches and merges changes from the remote main branch. |
| git fetch | Fetches updates from the default remote. |
| git fetch origin | Fetches updates specifically from the origin remote. |
| git merge origin/main | Merges the remote main branch into the current local branch. |
| git push origin –delete branchname | Deletes the specified branch from the remote repository. |
| git remote rename old new | Renames a remote from old to new. |
| git remote remove origin | Removes the origin remote from the local repository. |
Leave a Reply