
What Is Jenkins?
Jenkins is a free and open source automation tool used to automate the software development lifecycle. It helps teams build, test, and deploy code faster and more reliably. Jenkins is widely used for both Continuous Integration and Continuous Delivery.
In Continuous Integration, code changes are frequently merged into a shared repository and automatically built and tested to detect issues early.
In Continuous Delivery, Jenkins prepares the application for release by automating deployment steps. In most cases, a manual approval step is included before deploying to production.
Why Jenkins Is Needed in DevOps?
Jenkins is popular because it is open source, highly extensible through plugins, and backed by a strong community. It integrates easily with Git, Maven, Docker, cloud platforms, and multiple testing tools.
- Automates repetitive tasks
- Reduces manual errors
- Speeds up software delivery
- Integrates with Git, Docker, Kubernetes, AWS, and other tools
- Supports CI and CD pipelines
- Highly customizable using plugins
Jenkins Job Types
Freestyle Job
A Freestyle job is the most basic job type in Jenkins and is configured using the graphical user interface. It is suitable for beginners who want to automate simple build, test, or deployment tasks. It is mainly used for small projects or learning purposes.
Pipeline Job
A Pipeline job defines the entire workflow as code using a Jenkinsfile. It is commonly used for complex CI and CD pipelines and provides better control, visibility, and scalability.
Installing Jenkins on Ubuntu
Before installing Jenkins on Ubuntu, make sure the system is updated and Java is installed. Jenkins requires Java to run.
Step 1: Update the System
sudo apt update -y
Step 2: Install Java
Install OpenJDK, which is recommended for running Jenkins.
sudo apt install fontconfig openjdk-21-jre -y
Verify the Java installation:
java -version
Step 3: Add Jenkins Repository
Go to official website Jenkins. It is recommended to use the Jenkins Long Term Support release for better stability.
Add the Jenkins repository key:
sudo wget -O /etc/apt/keyrings/jenkins-keyring.asc \
https://pkg.jenkins.io/debian-stable/jenkins.io-2023.key
Add the Jenkins repository to your system:
echo "deb [signed-by=/etc/apt/keyrings/jenkins-keyring.asc] \
https://pkg.jenkins.io/debian-stable binary/" | sudo tee \
/etc/apt/sources.list.d/jenkins.list > /dev/null
Step 4: Install Jenkins
Update the package list and install Jenkins:
sudo apt update -y
sudo apt install jenkins -y
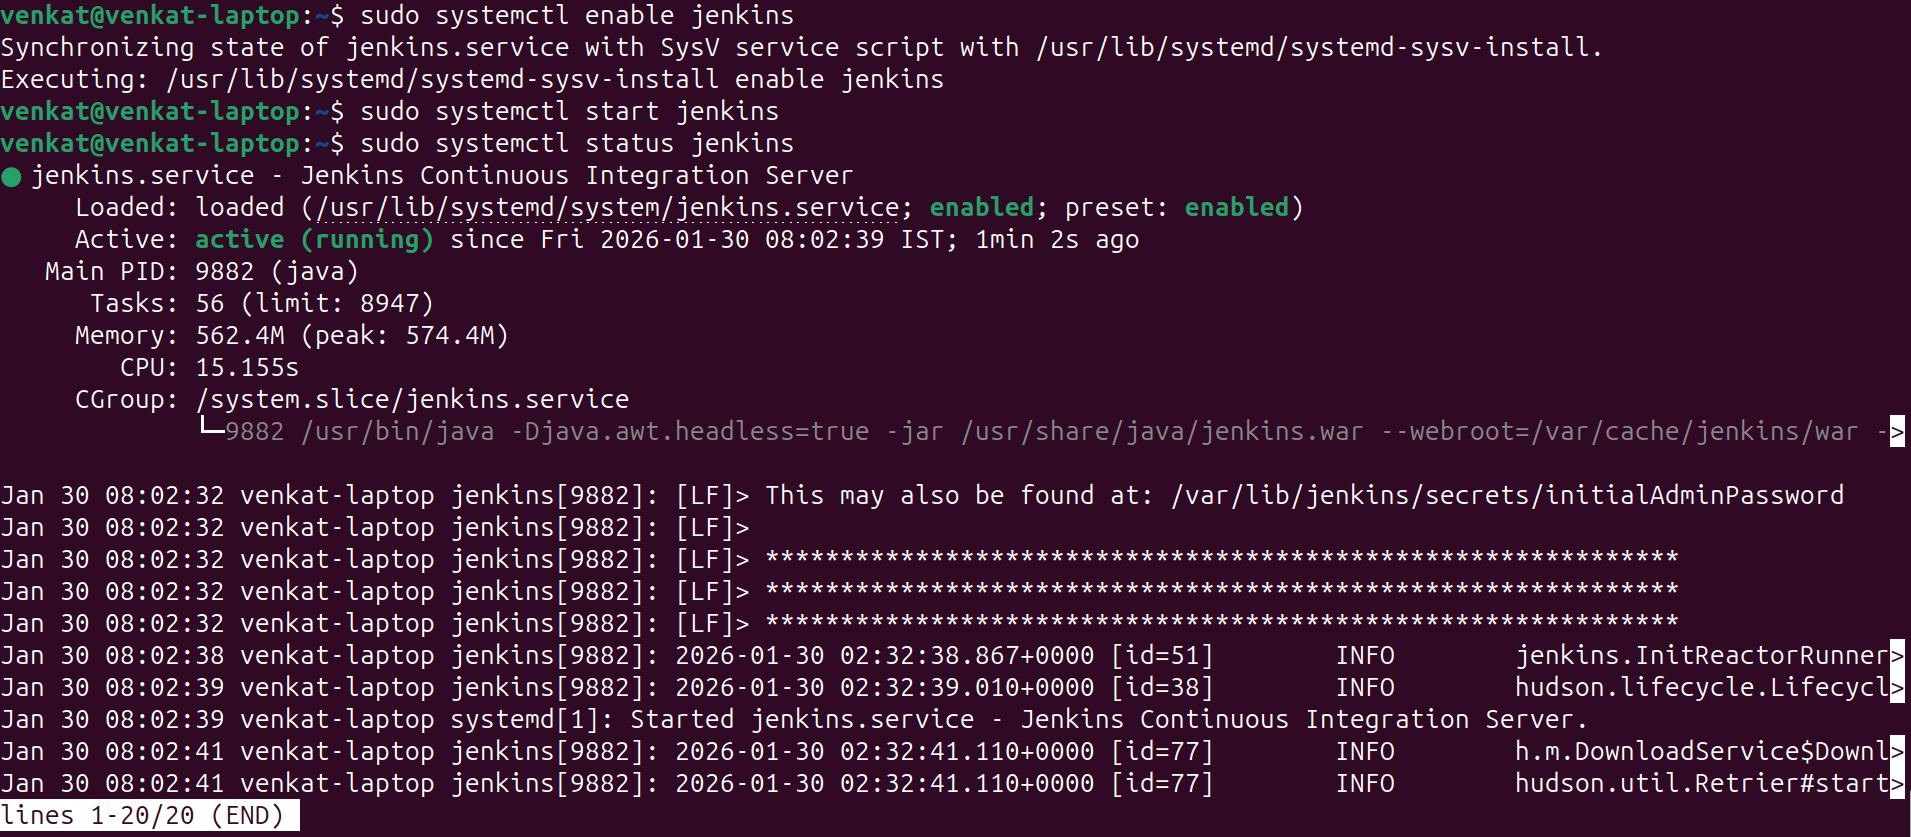
Step 5: Enable and Start Jenkins Service
After installation, enable Jenkins to start automatically and then start the service:
sudo systemctl enable jenkins
sudo systemctl start jenkins
sudo systemctl status jenkins
Step 6: Access Jenkins Web Interface
Open a web browser and access Jenkins using the following URL:
http://localhost:8080
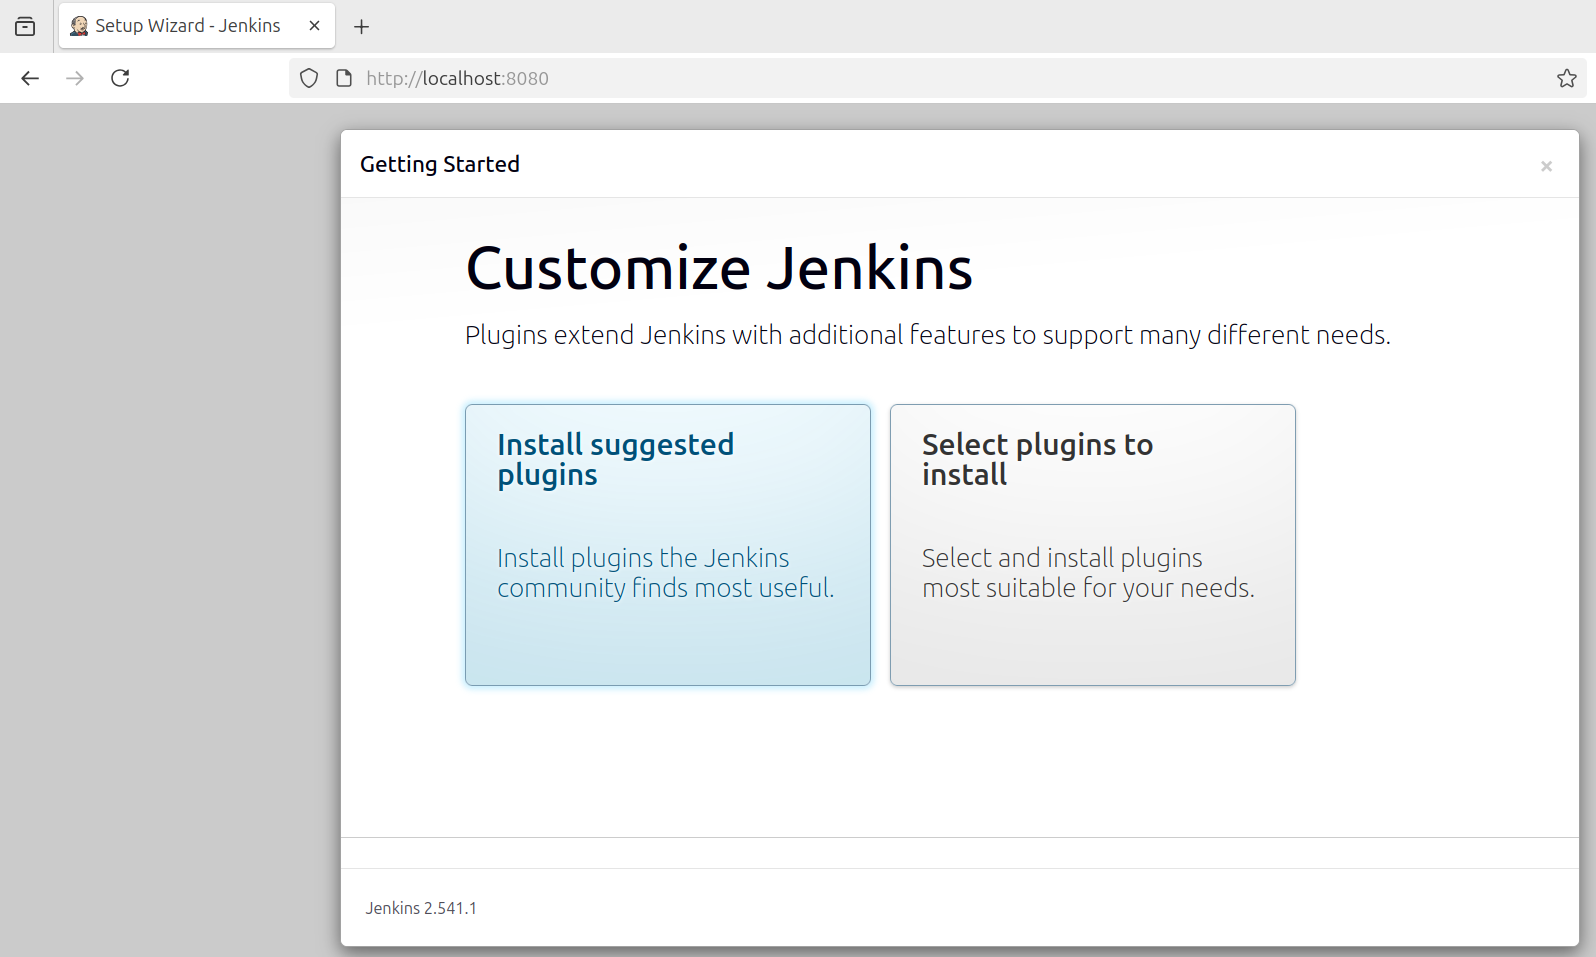
Install the suggested plugins during setup.
Step 7: Unlock Jenkins
During the initial setup, Jenkins will ask for an initial administrator password. Run the following command to retrieve it:
sudo cat /var/lib/jenkins/secrets/initialAdminPassword
Copy the password and paste it into the Jenkins setup screen.

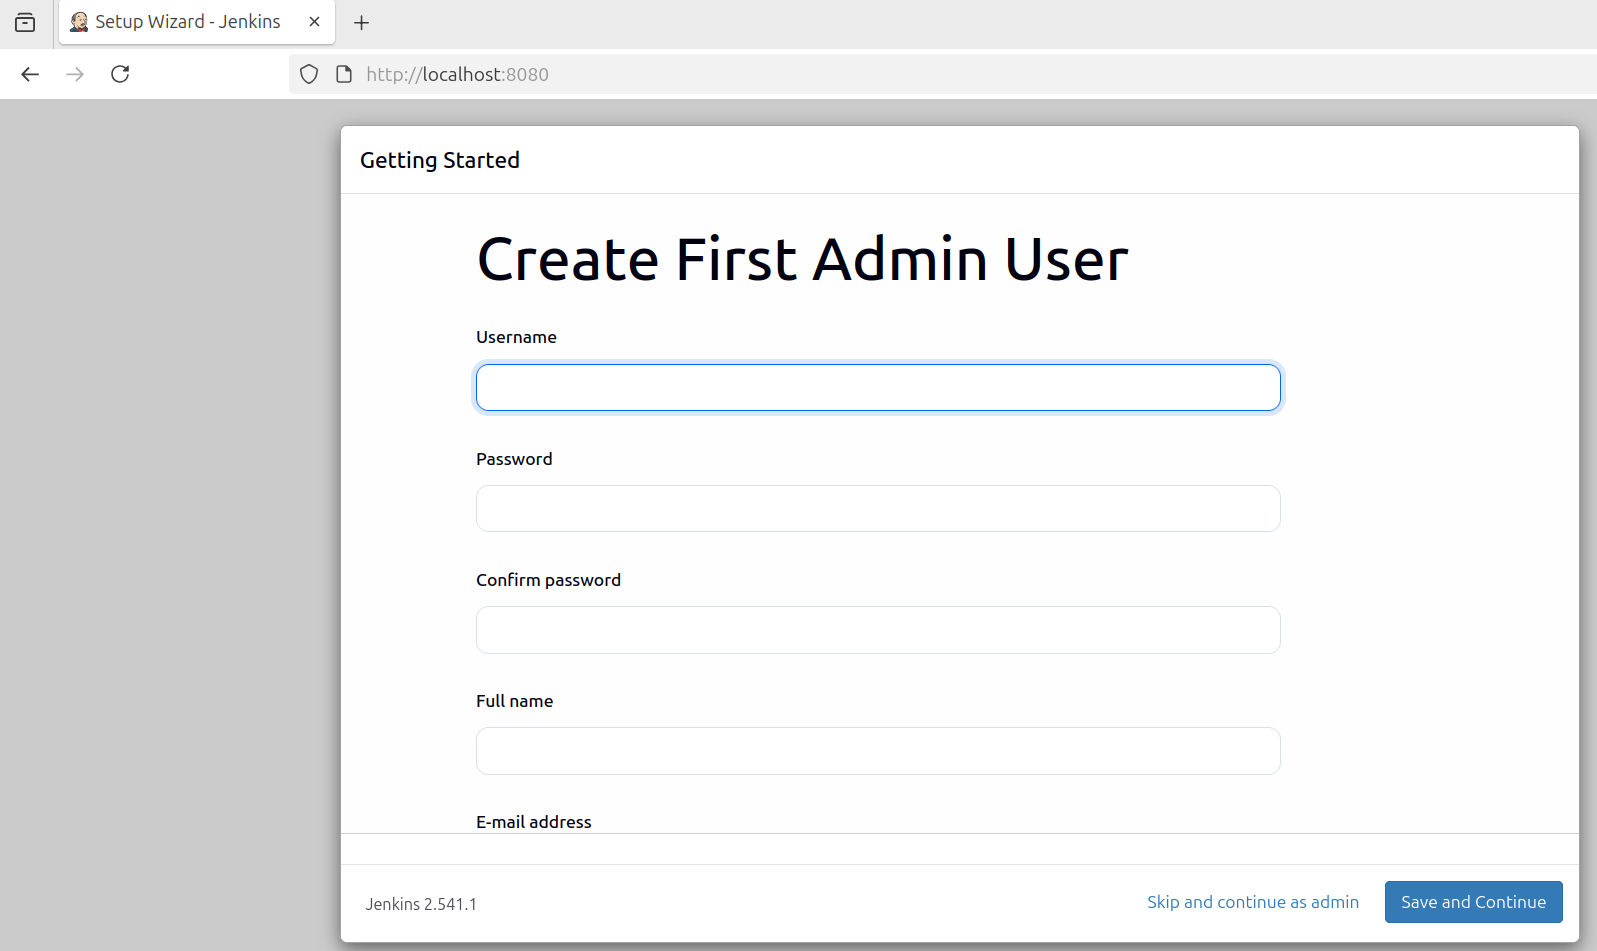
Step 8: Create Admin User
After unlocking Jenkins, create an admin user by providing a username, password, and email address. These credentials will be used for future logins.
Configure the Build Step Using Bash Commands
I recommend learning basic Linux and shell scripting to better understand Jenkins, since some basic concepts are used in this blog.
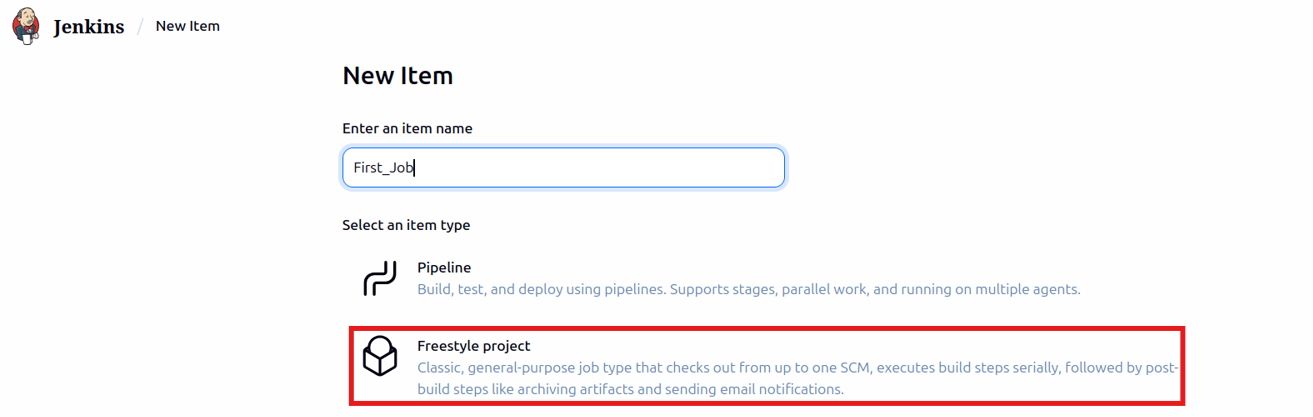
Create a New Freestyle Job
- Click New Item
- Enter a job name
- Select Freestyle project
- Click OK
Add a description to explain what the job does.

Add a Build Step
Scroll down to the Build section.
- Click Add build step
- Select Execute shell
This section is used to write Bash commands.
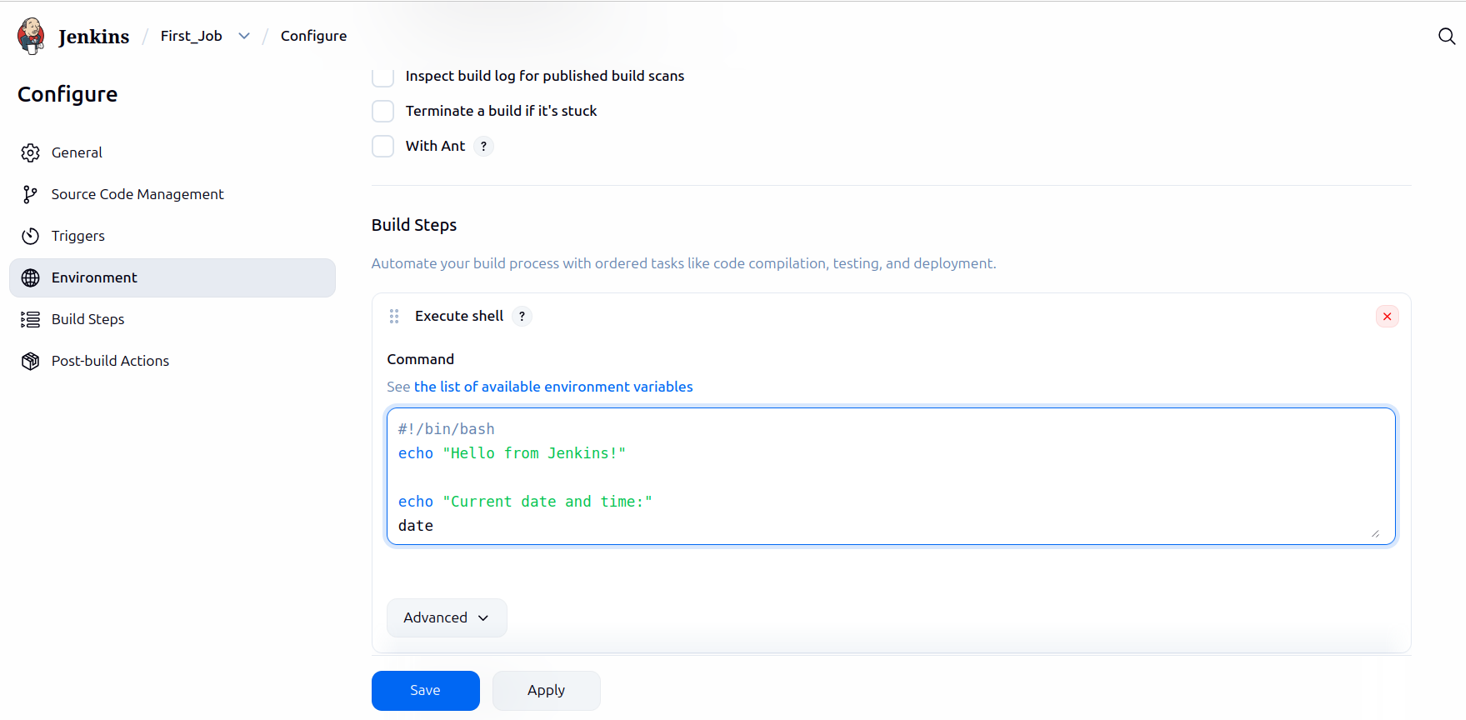
Write a Simple Bash Command
In the Command field, add the following:
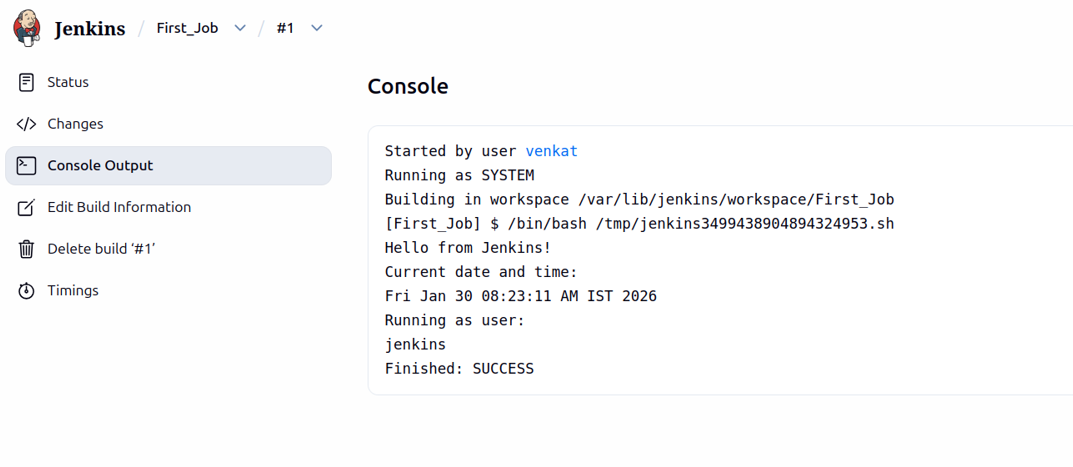
#!/bin/bash

echo "Hello from Jenkins!"

echo "Current date and time:"
date

echo "Running as user:"
whoami
View the console output after clicking Build Now.
Git Public Repository Integration in Jenkins
Ensure Git is installed before proceeding.
sudo apt update
sudo apt install git -y
Create a Jenkins Freestyle Job
- Click New Item
- Job name: jenkins-git-demo
- Select Freestyle project
- Click OK
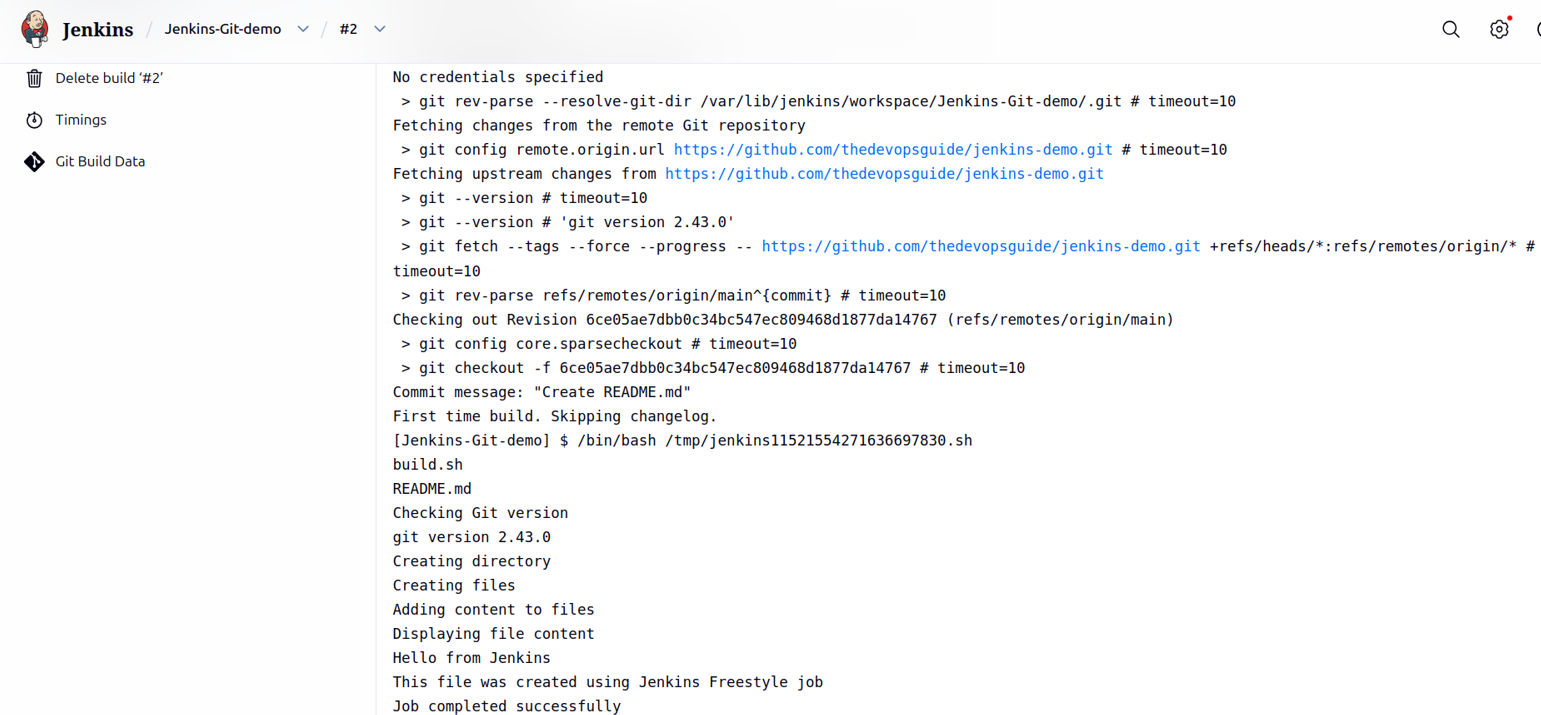
Connect Jenkins to a Public GitHub Repository
In the job configuration:
- Go to Source Code Management
- Select Git
- Enter the repository URL
https://github.com/thedevopsguide/jenkins-demo.git
Credentials: None since the repository is public
Branch:
*/main

Add a Build Step
Scroll down to the Build section.
- Click Add build step
- Select Execute shell
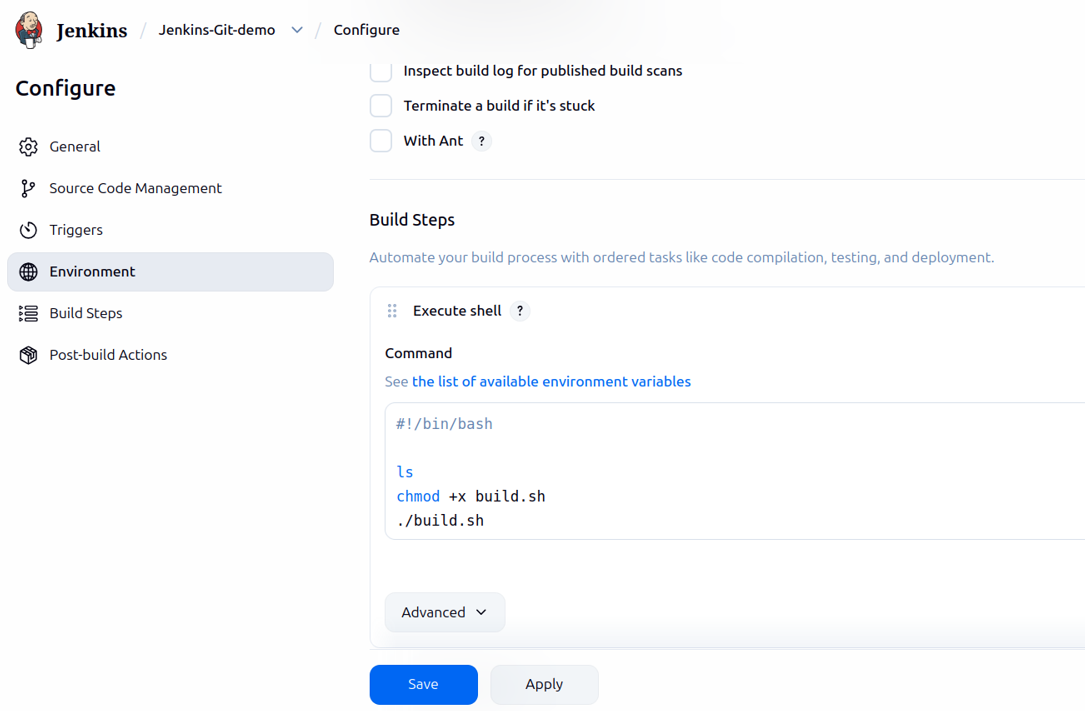
The following Bash commands grant execution permission and run the script.
#!/bin/bash
chmod +x build.sh
./build.sh
Check the console output after clicking Build Now.
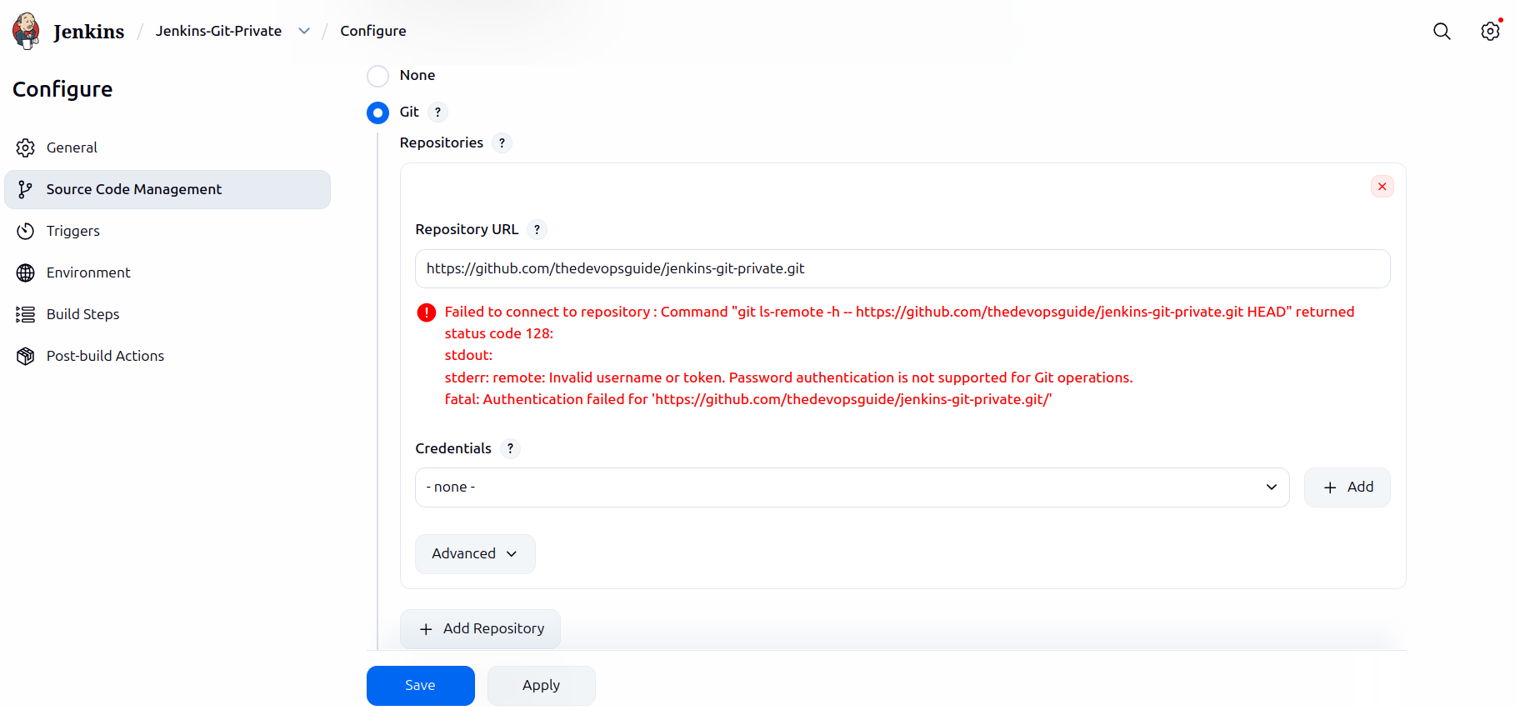
Git Private Repository Integration in Jenkins
In real world projects, most Git repositories are private for security reasons. When Jenkins pulls code from a private repository, authentication is required.
Why Credentials Are Required
- Private repositories are protected
- GitHub requires authentication
- Jenkins cannot enter credentials interactively
- Credentials must be stored securely in Jenkins
Without credentials, Jenkins may fail with errors such as:
ERROR: Repository not found
fatal: Authentication failed
Private Repository Structure
simple-private-repo/
├── hello.sh
└── README.md
hello.sh
#!/bin/bash
echo "Hello from Jenkins private repository!"
Create Job
Create a new item and select Freestyle Project.
Name: Jenkins-Git-Private
Source Code Management
Select Git and use HTTPS.
Create a private GitHub repository using the above files and provide the private repository URL.
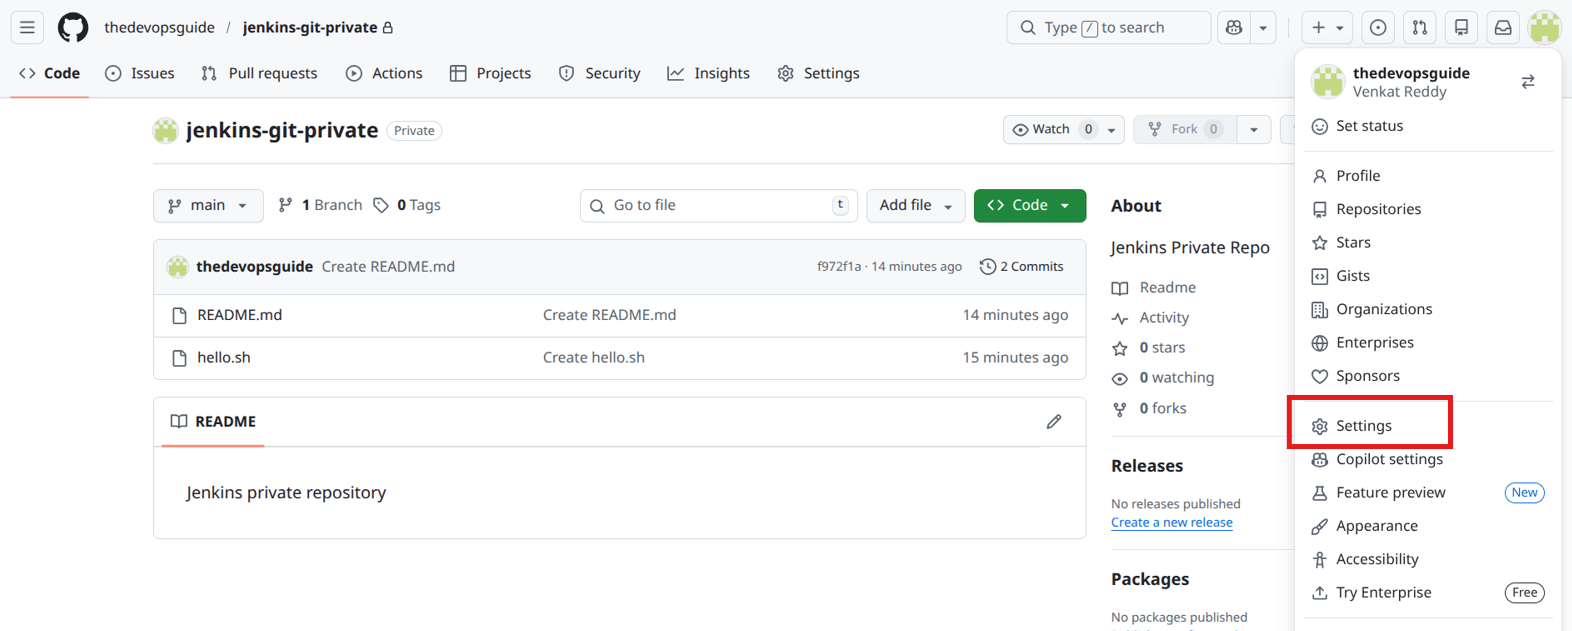
Generate GitHub Personal Access Token
Go to GitHub Settings, then Developer settings, then Personal access tokens, and select Fine-grained tokens.
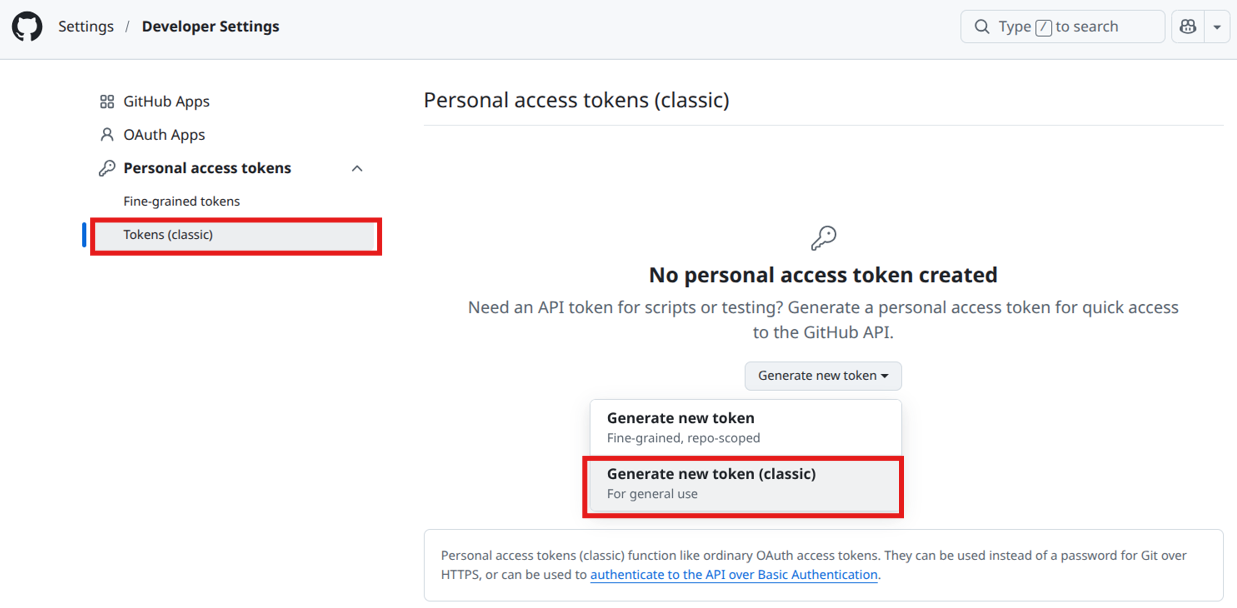
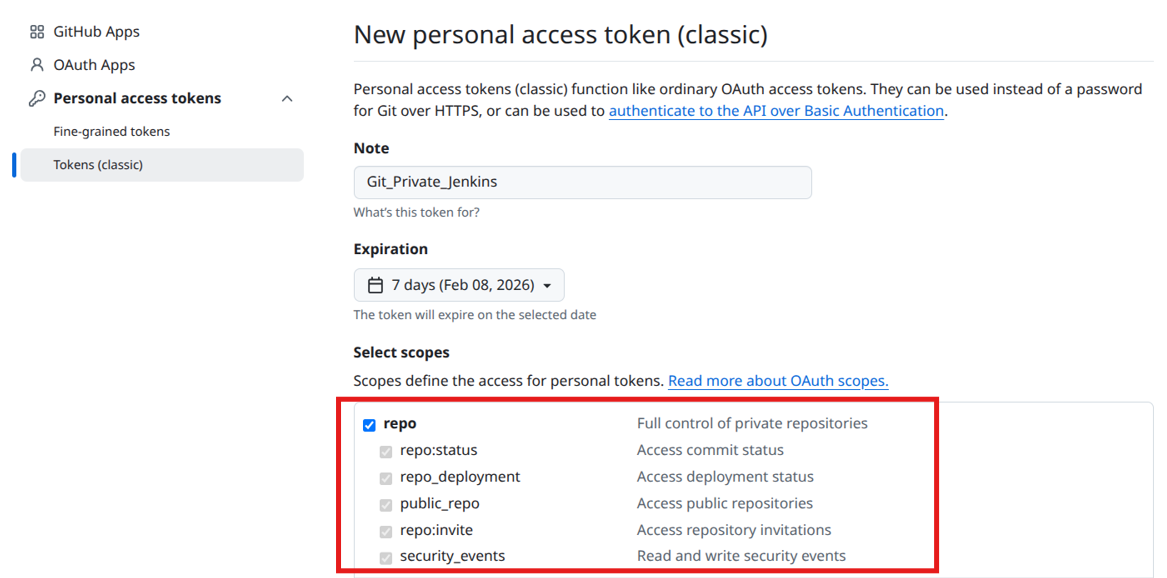
Token details:
- Token name: Git_Private_Jenkins
- Expiration: Set expiry to 7 days
Click Generate token and copy the token immediately, as it will not be shown again.
Add Token to Jenkins
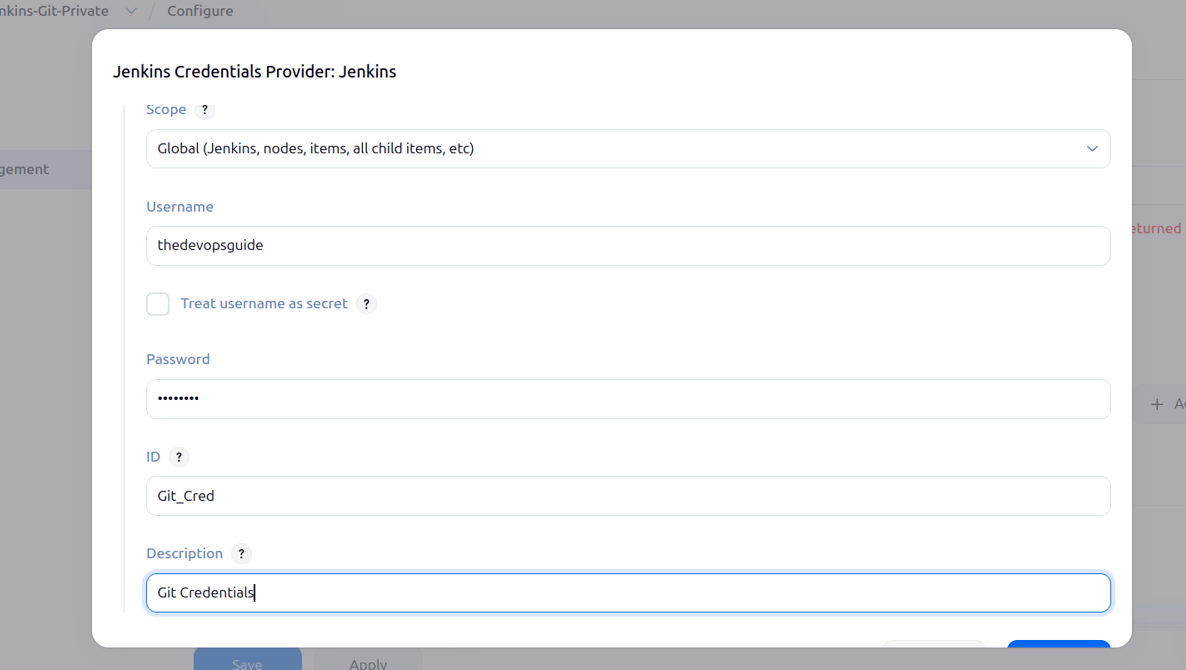
Go to Jenkins, open Manage Jenkins, then Credentials.
- Kind: Username with password
- Username: Your GitHub username
- Password: Paste the personal access token
- ID: Git_Cred
- Description: GitHub credentials for private repository
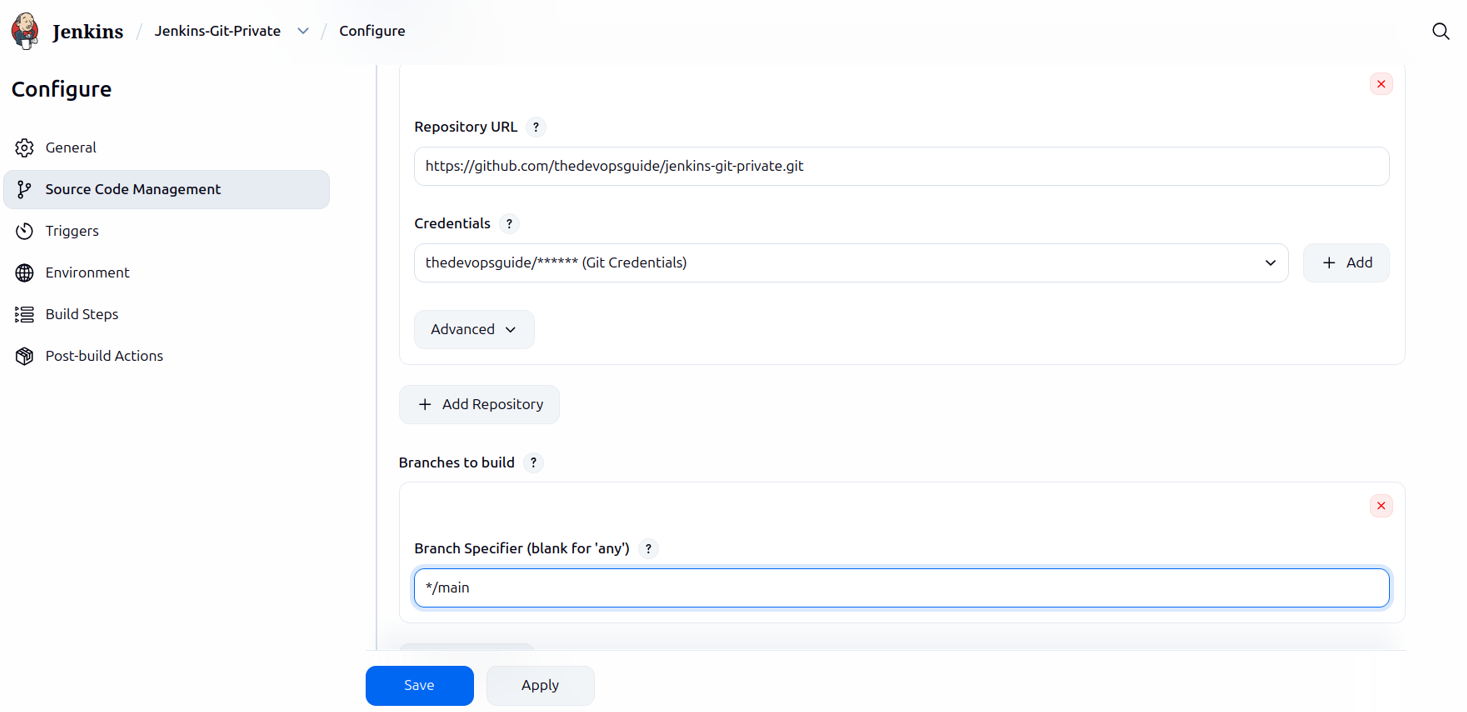
Select the saved credentials:
Git_Cred
Provide the private repository URL, select the Git credentials from the dropdown, and choose the correct branch.
Branch:
*/main
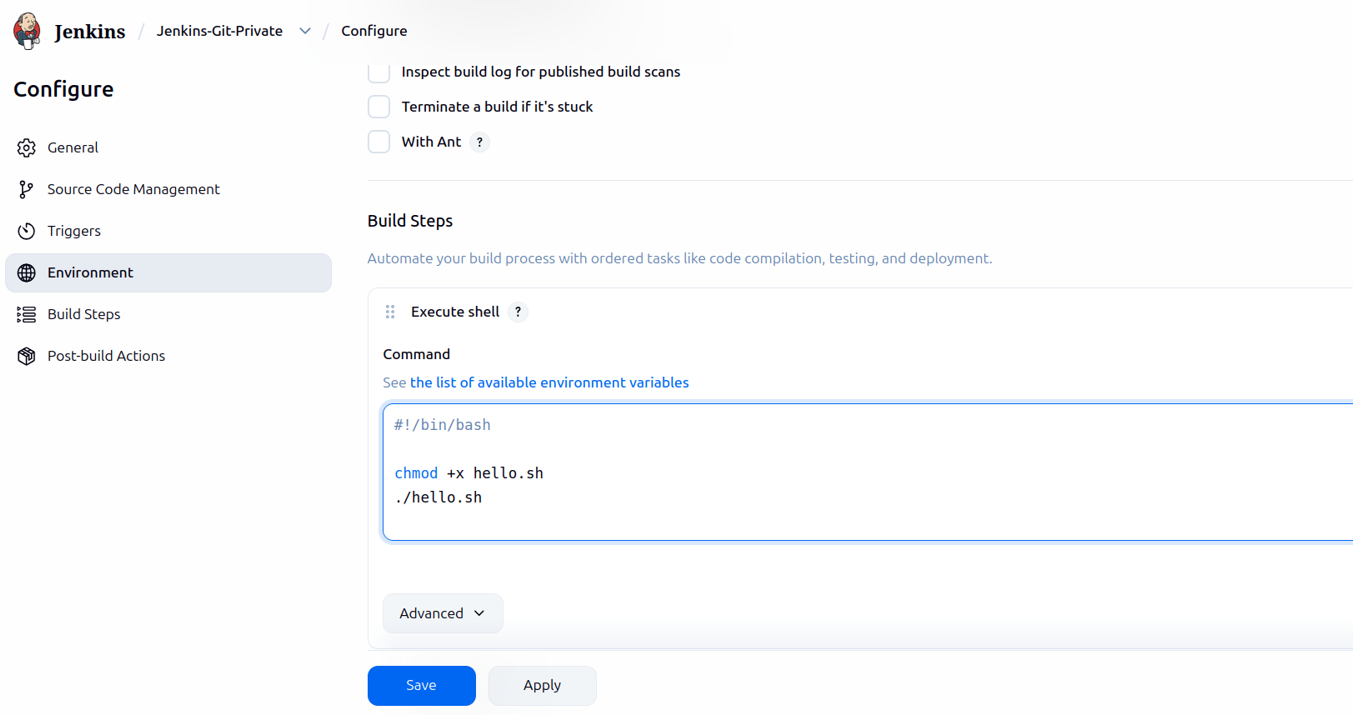
Build Step
#!/bin/bash
chmod +x hello.sh
./hello.sh
After clicking Build Now, the output will be visible in the console output.
Expected Output
Hello from Jenkins private repository!
Environment Variables in Jenkins
Environment variables are key value pairs provided by Jenkins at runtime. They help make jobs dynamic, reusable, and easier to maintain.
Built-In Jenkins Environment Variables
| Variable | Description |
|---|---|
| BUILD_NUMBER | Current build number |
| JOB_NAME | Name of the job |
| WORKSPACE | Path to the job workspace |
| BUILD_ID | Unique build identifier |
| BUILD_TAG | Build tag string |
| JENKINS_HOME | Jenkins home directory |
| GIT_BRANCH | Git branch name |
| GIT_COMMIT | Git commit ID |
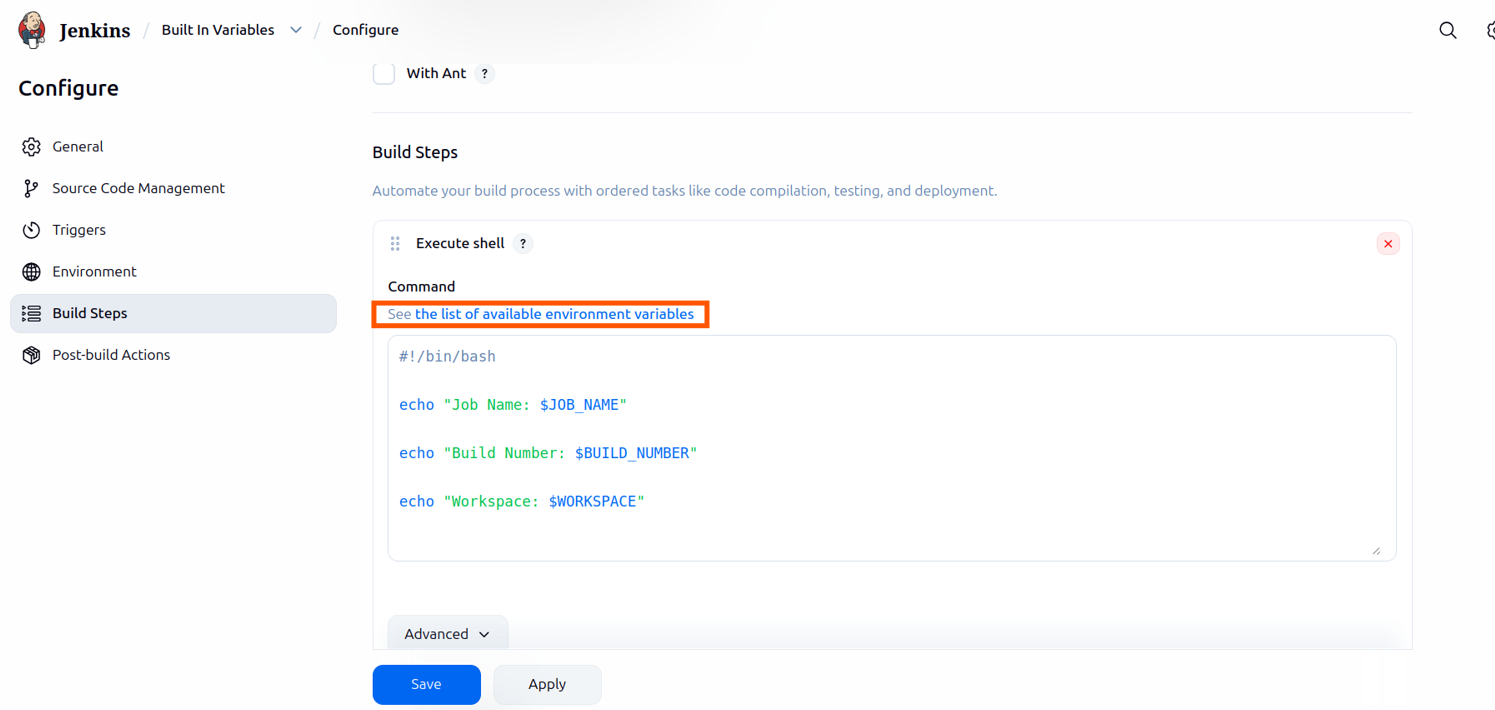
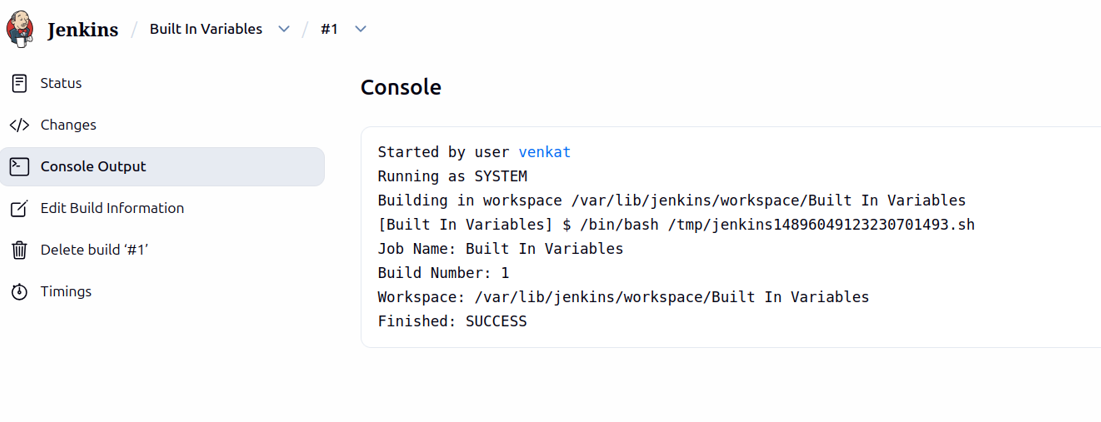
Create a new job, add a meaningful description, and go to the Build Steps section. Under Execute Shell, paste the following script. To view all available environment variables, use the option shown in the image below.
#!/bin/bash
echo "Job Name: $JOB_NAME"
echo "Build Number: $BUILD_NUMBER"
echo "Workspace: $WORKSPACE"
echo "Git Branch: $GIT_BRANCH"
After saving the job and clicking Build Now, the output will be displayed in the console.
Build Parameters in Jenkins
Build parameters allow users to pass values when triggering a job, making it reusable for different environments and versions.
Enable Parameters
- Open the job
- Click Configure
- Check This project is parameterized
After checking the box for This project is parameterized, you can see the Add Parameter option. Click on it to view the list of available parameters.

String Parameter
- Name: VERSION
- Default Value: 1.0.0
- Description: Application version
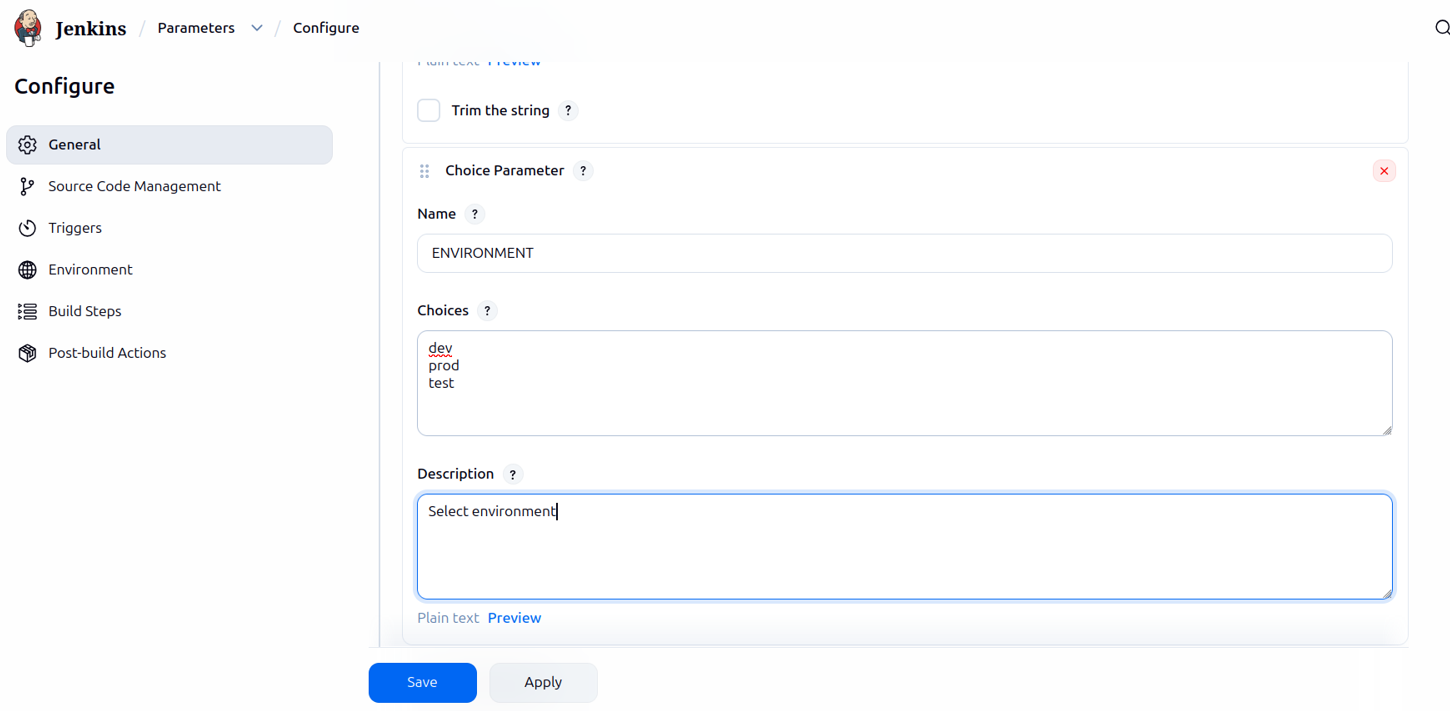
Choice Parameter
- Name: ENVIRONMENT
- Choices: dev, test, prod
- Description: Select environment
Create a sample job for these build parameters. Add a description for the job, check the box for This project is parameterized, and select String Parameter. Set the name as VERSION, the default value as 1.0.0, and the description as Application version. Then select Choice Parameter and set the name as ENVIRONMENT, the choices as dev, test, and prod, and provide a description.
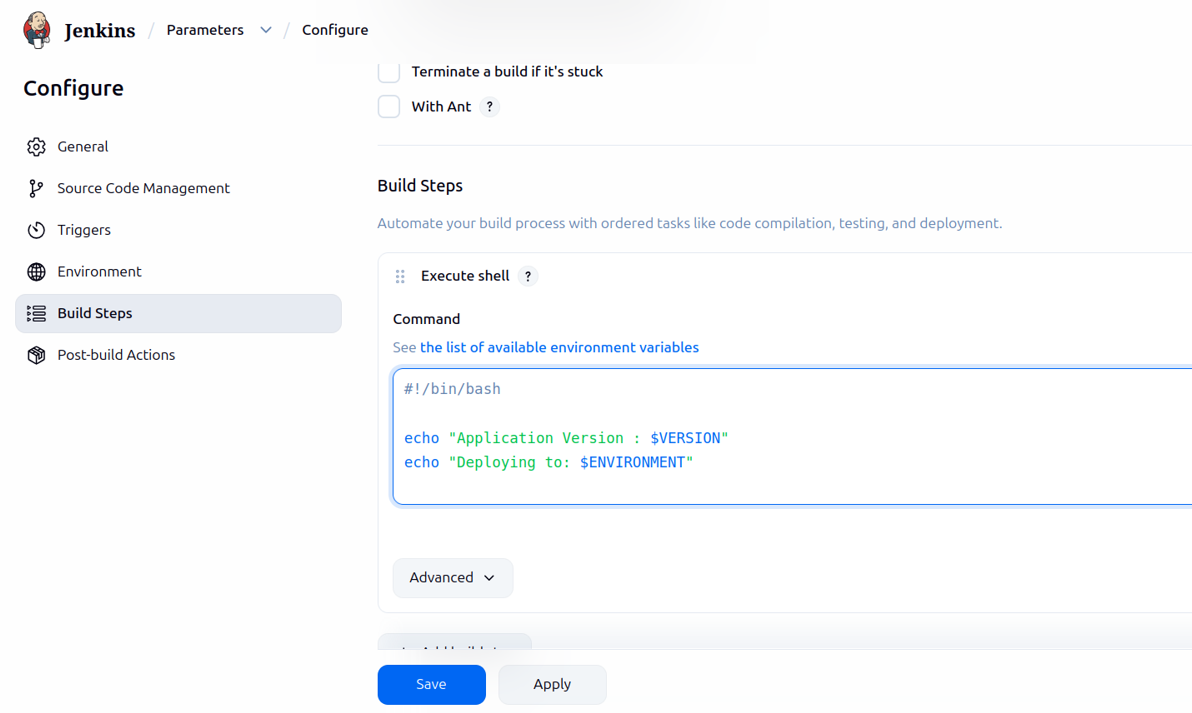
Go to Build Steps, select Execute Shell, and paste the script below.
Use Parameters in Build Step
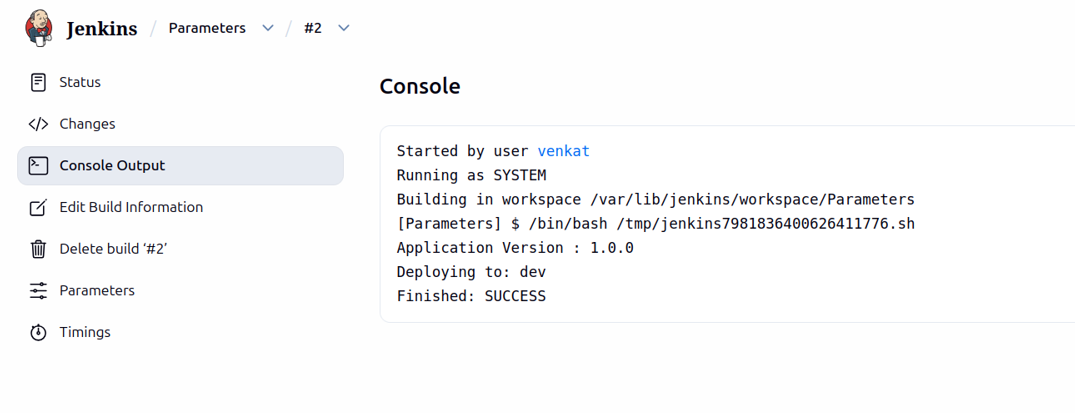
#!/bin/bash

echo "Application Version: $VERSION"
echo "Deploying to: $ENVIRONMENT"
After saving all configurations, you can see the Build with Parameters option on the job page. You can change the parameter values based on your requirement.
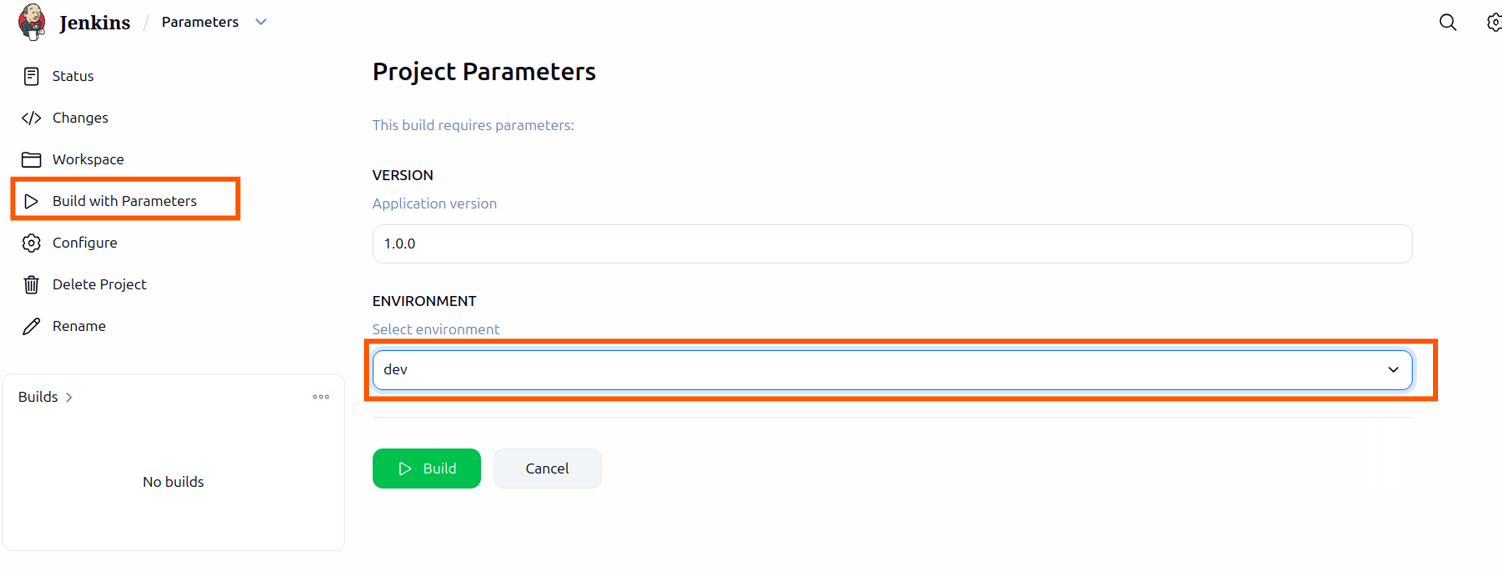
After clicking Build, you can see the console output.
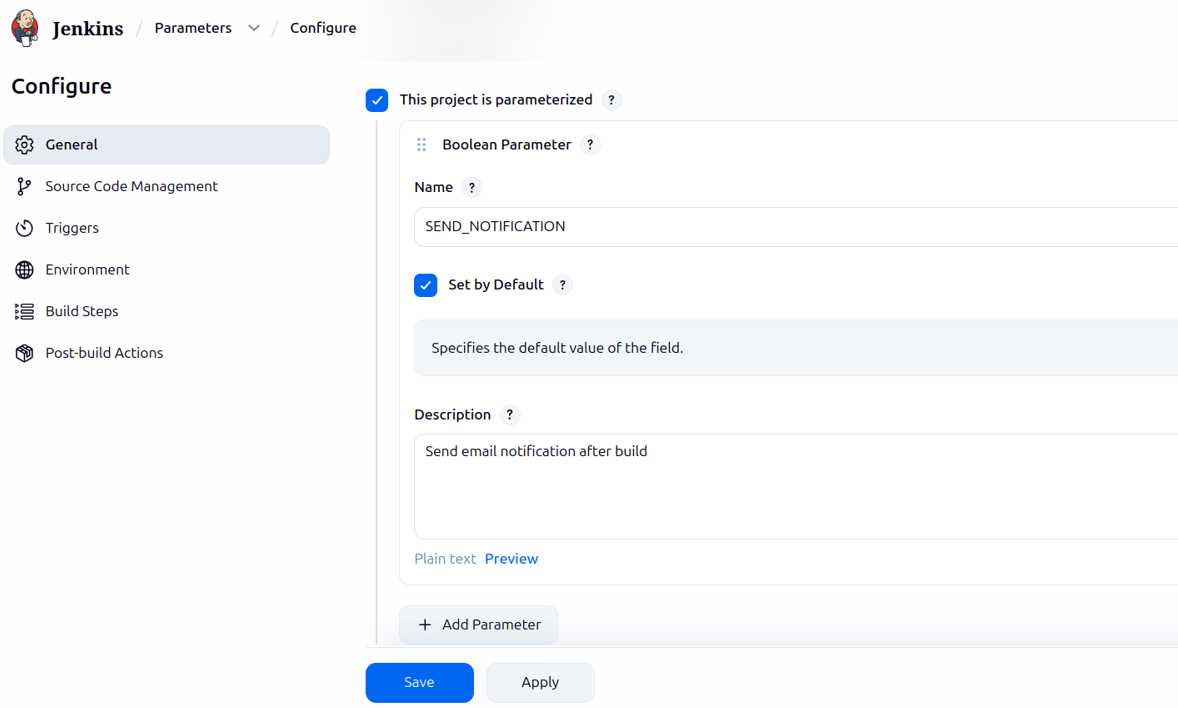
Boolean Parameter
A Boolean parameter provides a true or false option using a checkbox.
Create a new job, check the box for This project is parameterized, and select the Boolean Parameter.
Add Boolean Parameter
- Name: SEND_NOTIFICATION
- Description: Send email notification after the build
- Default Value: Unchecked
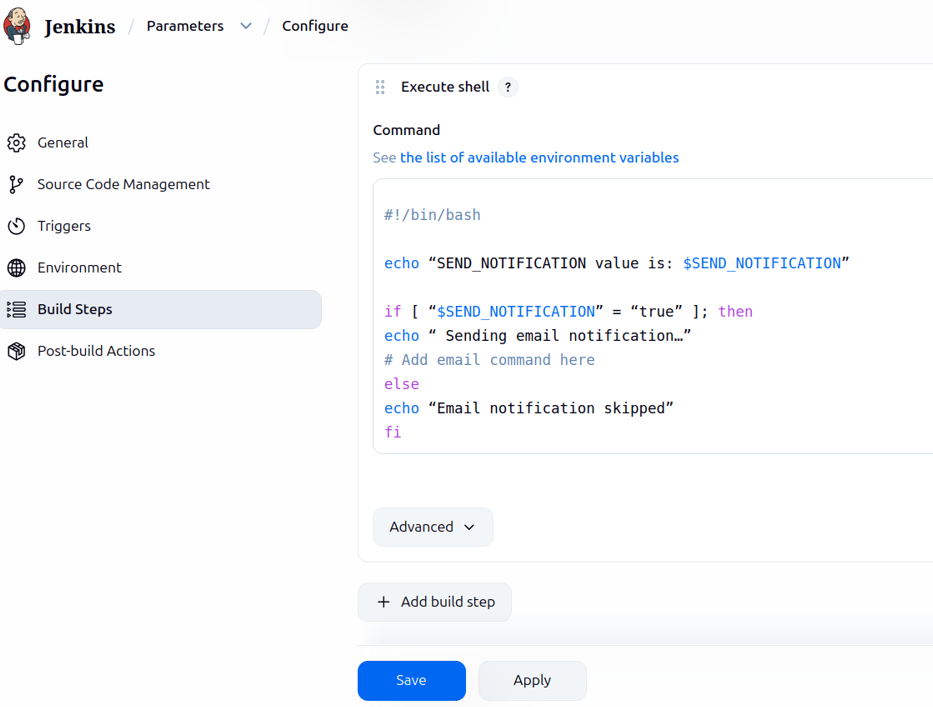
Go to Build Steps, select Execute Shell, and paste the script below.
#!/bin/bash

echo "SEND_NOTIFICATION value is: $SEND_NOTIFICATION"

if [ "$SEND_NOTIFICATION" = "true" ]; then
  echo "Sending email notification..."
else
  echo "Email notification skipped"
fi
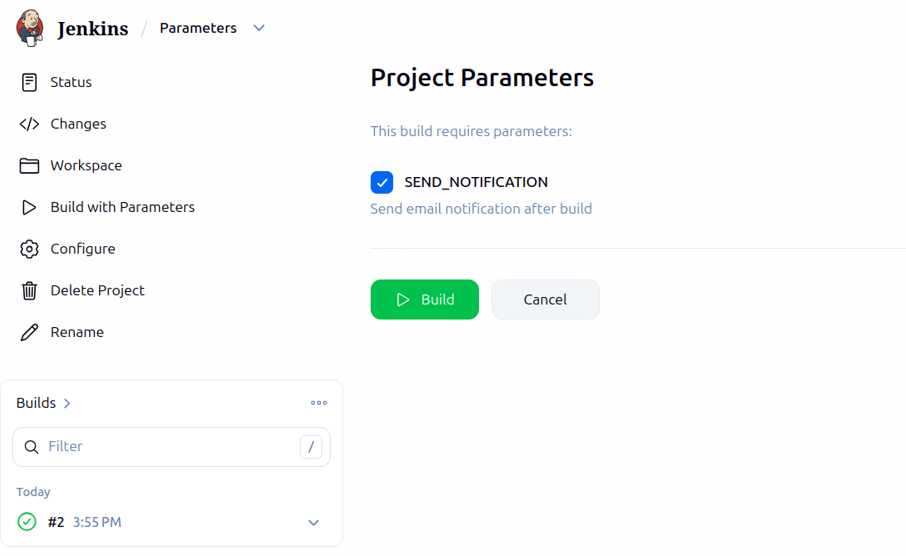
In Jenkins UI:
- Checked means true
- Unchecked means false
After saving all configurations, you can see the Build option with a checkbox for SEND_NOTIFICATION. Check or uncheck it based on your requirement, click the Build button, and view the console output.
Post-Build Actions in Jenkins
Post-build actions run after the main build process finishes. They are commonly used to save build outputs, archive files, send notifications, or trigger other Jenkins jobs.
Archiving Artifacts in Jenkins
Artifacts are files generated during a build that you want to store, view, or download later.
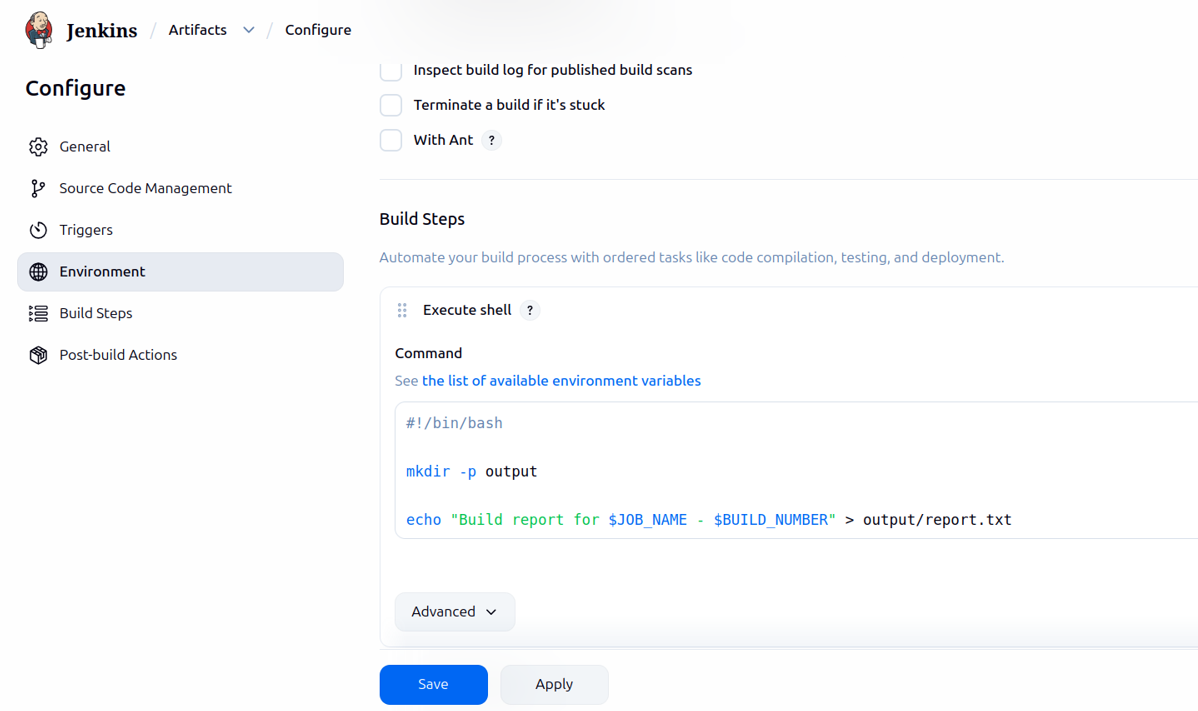
Step 1: Generate a Sample Artifact
Create a new Freestyle job and go to Build Steps. Select Execute shell and add the Bash script below.
#!/bin/bash
mkdir -p output
echo "Build report for $JOB_NAME - $BUILD_NUMBER" > output/report.txt
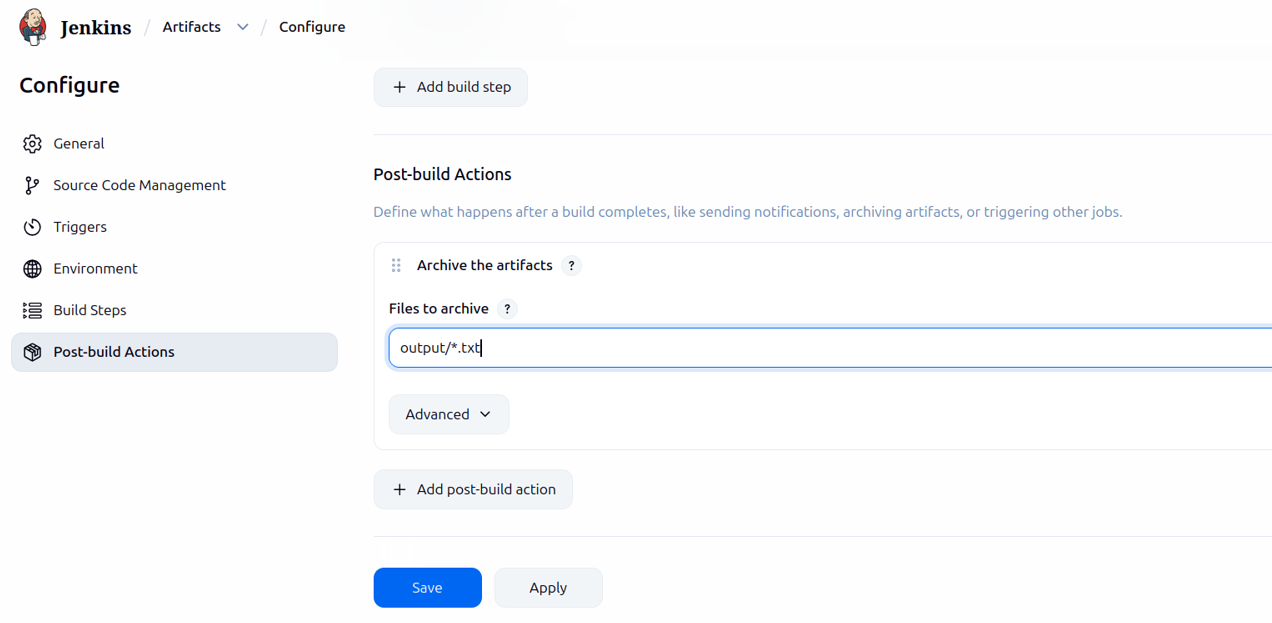
Step 2: Archive the Artifact
- Scroll down to Post-build Actions
- Click Add post-build action
- Select Archive the artifacts
- In Files to archive, enter: output/*.txt
- Click Save
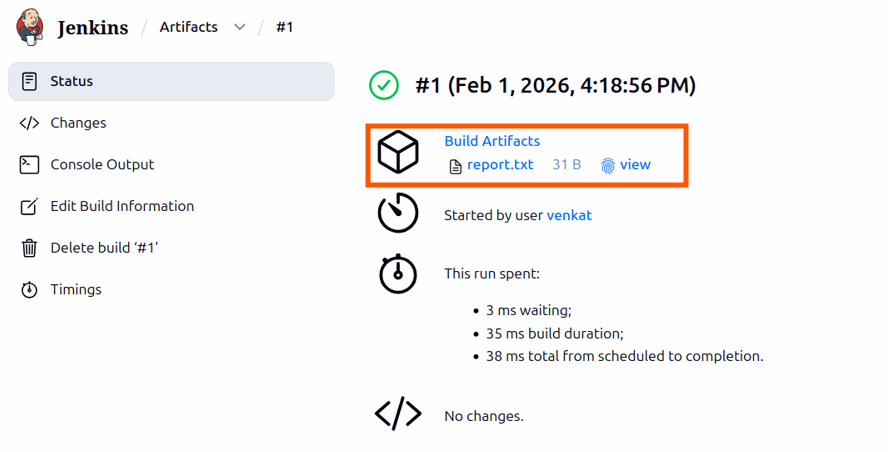
Step 3: Verify the Artifact
- Run the job
- Click the build number
- You will see an Artifacts section
- Click report.txt to download the file
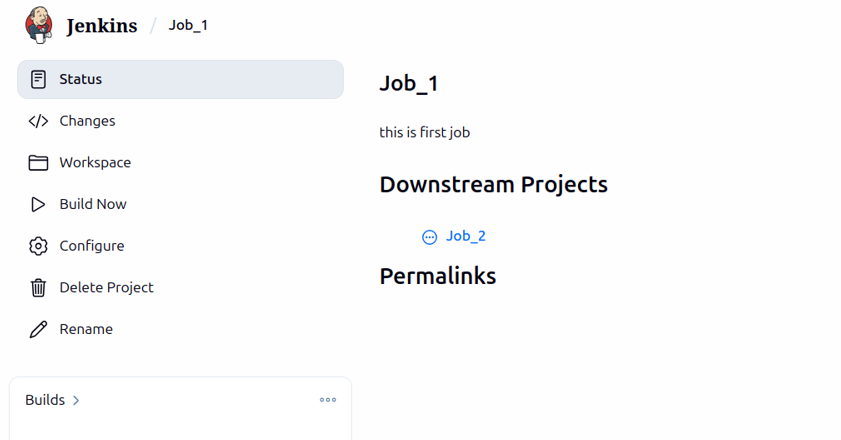
Triggering Another Jenkins Job
Post-build actions also allow you to chain multiple jobs together to create multi-step workflows.
Example workflow:
- Job_1
- Job_2
In this setup, Jenkins automatically runs Job_2 after Job_1 completes.
Step 1: Create the First Job
Create a new Freestyle job named:
Job_1
Add the following build step:
#!/bin/bash
echo "First Job running..."

Step 2: Create the Second Job
Create another Freestyle job named:
Job_2
Add the following build step:
#!/bin/bash
echo "Second Job running..."
Step 3: Trigger Job 2 from Job 1
- Open the configuration of Job_2
- Check Build after other projects are built
- In Projects to watch, enter: Job_1
You can control when Job_2 is triggered by selecting one of the following options:
- Trigger only if the build is stable
- Trigger even if the build is unstable
- Trigger even if the build fails
- Always trigger, even if the build is aborted
Click Save. Now, whenever Job_1 runs, Job_2 will be triggered based on the selected condition.

If your setup is correct, you can see the Downstream Projects section after the build. It will display the next build job.
After clicking Build Now in Job_1, it automatically builds Job_2.
Build Triggers in Jenkins
Build triggers in Jenkins define when a job should run automatically. Jenkins supports multiple trigger types such as:
- Build periodically
- SCM polling
- Webhooks
Here, SCM polling and Build periodically use cron syntax. Let us first understand what cron syntax is.
What Is Cron Syntax?
Cron syntax is used to define schedules for recurring tasks. In Jenkins, it is used for Build periodically and SCM polling. A cron expression consists of five fields that specify the time and frequency of execution.
Cron Format
| Field | Range | Description |
|---|---|---|
| Minute | 0 to 59 | Minute of the hour |
| Hour | 0 to 23 | Hour of the day |
| Day of Month | 1 to 31 | Day of the month |
| Month | 1 to 12 | Month of the year |
| Day of Week | 0 to 7 | Day of the week |
Special characters used in cron:
- * means every value
- H means a hashed value for load distribution
- – is used to define a range
- / is used to define step values
Examples:
0 11 * * * runs every day at 11 AM
5 14 1-20 2 * runs from the 1st to the 20th of February at 2:05 PM
*/5 * * * * runs every five minutes
What Is Poll SCM?
Poll SCM means Jenkins periodically checks your Git repository for changes. If Jenkins detects new commits, it automatically triggers a build.
In simple words, Jenkins keeps asking GitHub:
Has anything changed?
If changes are found, Jenkins runs the job. If not, nothing happens.
How Poll SCM Works
- Jenkins runs based on the configured schedule
- It connects to the Git repository
- It compares the latest commit with the previous build
- If changes are detected, Jenkins triggers a build
- If no changes are found, Jenkins does nothing
How to Implement Poll SCM
Step 1: Open Job Configuration
- Go to the Jenkins Dashboard
- Click your job
- Click Configure
Step 2: Enable Poll SCM
- Scroll to the Build Triggers section
- Check Poll SCM
- Add a cron schedule
*/5 * * * *This means Jenkins checks the Git repository every 5 minutes.
Step 3: Save and Test
- Click Save
- Make a new commit in the Git repository
- Wait for up to 5 minutes
- Jenkins will automatically trigger the build
What Is a GitHub Webhook?
A webhook allows GitHub to directly notify Jenkins when code changes occur.
In simple words, GitHub tells Jenkins:
New code was pushed.
Jenkins immediately starts the build. This is a real time trigger and is recommended for production environments.
How Webhooks Work
- A developer pushes code to GitHub
- GitHub sends an HTTP request to Jenkins
- Jenkins receives the webhook event
- Jenkins triggers the job instantly
- The build starts without delay
How to Implement GitHub Webhooks
Step 1: Enable Webhook Trigger in Jenkins
- Open the Jenkins job
- Click Configure
- Scroll to Build Triggers
- Check GitHub hook trigger for GITScm polling
- Click Save
Step 2: Get Jenkins Webhook URL
Webhook URL format:
http://your-jenkins-url/github-webhook/Step 3: Add Webhook in GitHub Repository
- Open your GitHub repository
- Go to Settings
- Click Webhooks
- Click Add webhook
Step 4: Configure Webhook Settings
- Payload URL:
http://your-jenkins-url/github-webhook/ - Content type: application/json
- Trigger events: Just the push event
- Keep the webhook active
Click Add webhook.
Step 5: Test the Webhook
- Go to GitHub Webhooks
- Select your webhook
- Push new code to the GitHub repository
- A new build will be triggered in Jenkins
Discard Old Builds in Jenkins
By default, Jenkins stores all past builds. While this is useful for debugging and auditing, it can quickly consume disk space and impact server performance.
The Discard Old Builds feature helps automatically delete older builds based on:
- Number of builds
- Age of builds
- Artifact retention
Why Discard Old Builds Is Important
- Saves disk space
- Improves Jenkins performance
- Prevents server crashes due to low storage
- Keeps only relevant build history
- Reduces storage costs on cloud servers
How to Enable Discard Old Builds Per Job
Step 1: Open Job Configuration
- Go to the Jenkins Dashboard
- Open your job
- Click Configure
Step 2: Enable Discard Old Builds
- In the General section
- Check Discard old builds
Step 3: Configure Retention Rules
You will see the following options:
| Field | Meaning |
|---|---|
| Days to keep builds | Deletes builds older than the specified number of days |
| Max number of builds to keep | Keeps only the specified number of most recent builds |
| Days to keep artifacts | Deletes artifacts older than the specified number of days |
| Max number of artifacts to keep | Keeps only the specified number of most recent artifacts |
Example Configuration
- Days to keep builds: 14
- Max number of builds to keep: 10
- Days to keep artifacts: 7
- Max number of artifacts to keep: 5
This configuration means:
- Only the last 10 builds are kept
- Builds older than 14 days are deleted
- Only the last 5 artifacts are retained
- Artifacts older than 7 days are deleted
Click Save to apply the changes.
Step 4: Verify Old Build Cleanup
- Run the job multiple times
- Wait for the retention rules to apply
- Older builds will be deleted automatically
Leave a Reply